
Ultimate Catalyst Guide
Catalyst ports your iPad apps over to macOS. This guide contains a ton of tips and tricks to help you succeed in adding Catalyst support to your app
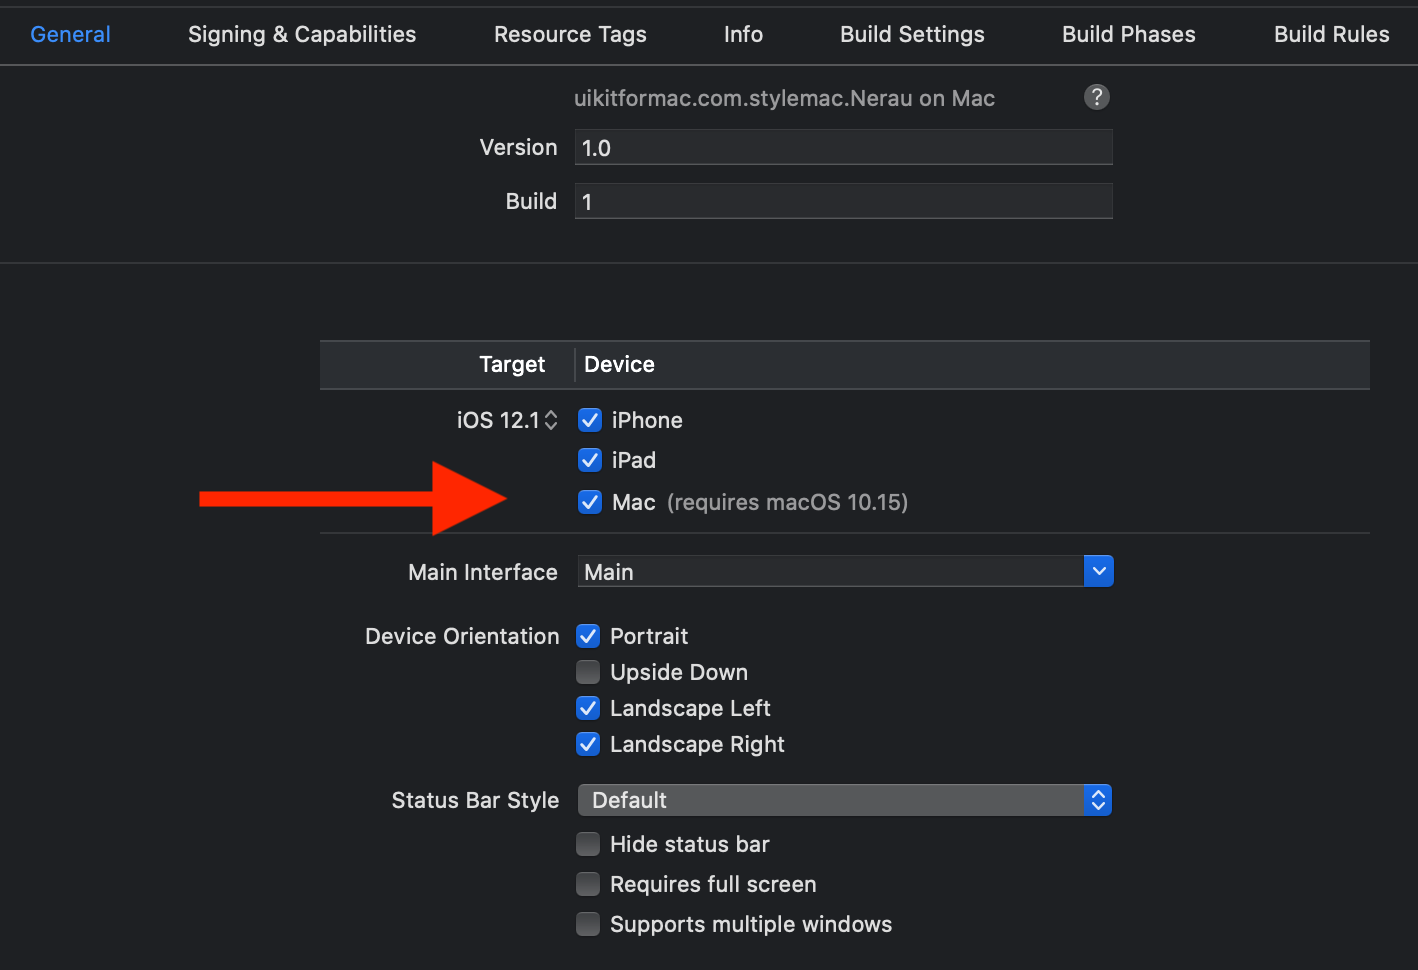
Catalyst is one of the major new features of iOS 13 and macOS 15. It allows you to take your iPad app, and, with the activation of a single checkbox, add a macOS target.
For very simple projects, this works great, but there are multiple issues that might run in to. Here is a brief selection:
- Deprecated iOS classes, such as
AddressBookUIorUIWebVieware not supported anymore - Some iOS classes, such as ARKit are not available on macOS
- Some iOS classes, such as StoreKit, have slightly different API
- The macOS API integrations such as
NSToolBarorNSMenuBarare currently quite limited - Problems with signing
This guide is a very detailed developer explanation of Catalyst and all the issues that you can run into in the current beta. It will be updated as new macOS betas are released.
Contents of this Guide
This guide will initially give a short introduction into Catalyst Next, we will iterate over the first steps to support the various features that make an iPad app a good macOS citizen. Finally, we will go through a long How Do I ... list of not-so-obvious things you might run into while working on Catalyst. As a sort of Appendix, we have a list of currently known issues you might run into. This is helpful to keep you from trying to hunt down a bug that's not yours.
Here's a bullet point guide on Catalyst:
- Run iPad apps on macOS
- macOS 13.0 only
- Supports most of iOS (i.e. no ARKit)
- Adds macOS sandbox support (and a
AppName.entitlementsfile - Uses Settings.bundle for automatic macOS Preferences
- You can build full-fledged macOS apps
- You can sell your apps outside of the Mac App Store
- Dynamic Type is disabled as it doesn't exist on macOS. Everything is Large
- Your whole app, when run on macOS, is resized to 77% of the original size. That's all automatic and in the background
- A default menu bar for your app.
- Support for trackpad, mouse, and keyboard input.
- Support for window resizing and full-screen display.
- Mac-style scroll bars.
- Copy-and-paste support.
- Drag-and-drop support.
- Support for system Touch Bar controls.
Apart from that, another major difference is that the Application Lifecycle behaves slightly different. We will look at that next.
The "Taking iPad apps for Mac to the Next Level" talk at WWDC 2019 has a fantastic overview of all the changes. Here is a brief overview:
- The
UIApplicationlifecycle is fully supported on macOS - The sequence is the same as on macOS
- State changes, however, do affect the Mac less, as are almost always Foreground + Active on macOS.
- Apps only enter background during termination and inactive when launching in the background.
- Your app should still take App Napp into account
- Background modes are allowed to finish when an app closes. The background tasks continue even though the app is already not visible anymore to the user
- Apps are not killed when they consume too much memory
- Background audio is not supported because users expect audio to stop when they quit an app
So, in short, your app is always in Foreground + Active except when it is (mostly) launching or terminating.
This is a short introduction into Catalyst. It will be extended constantly.
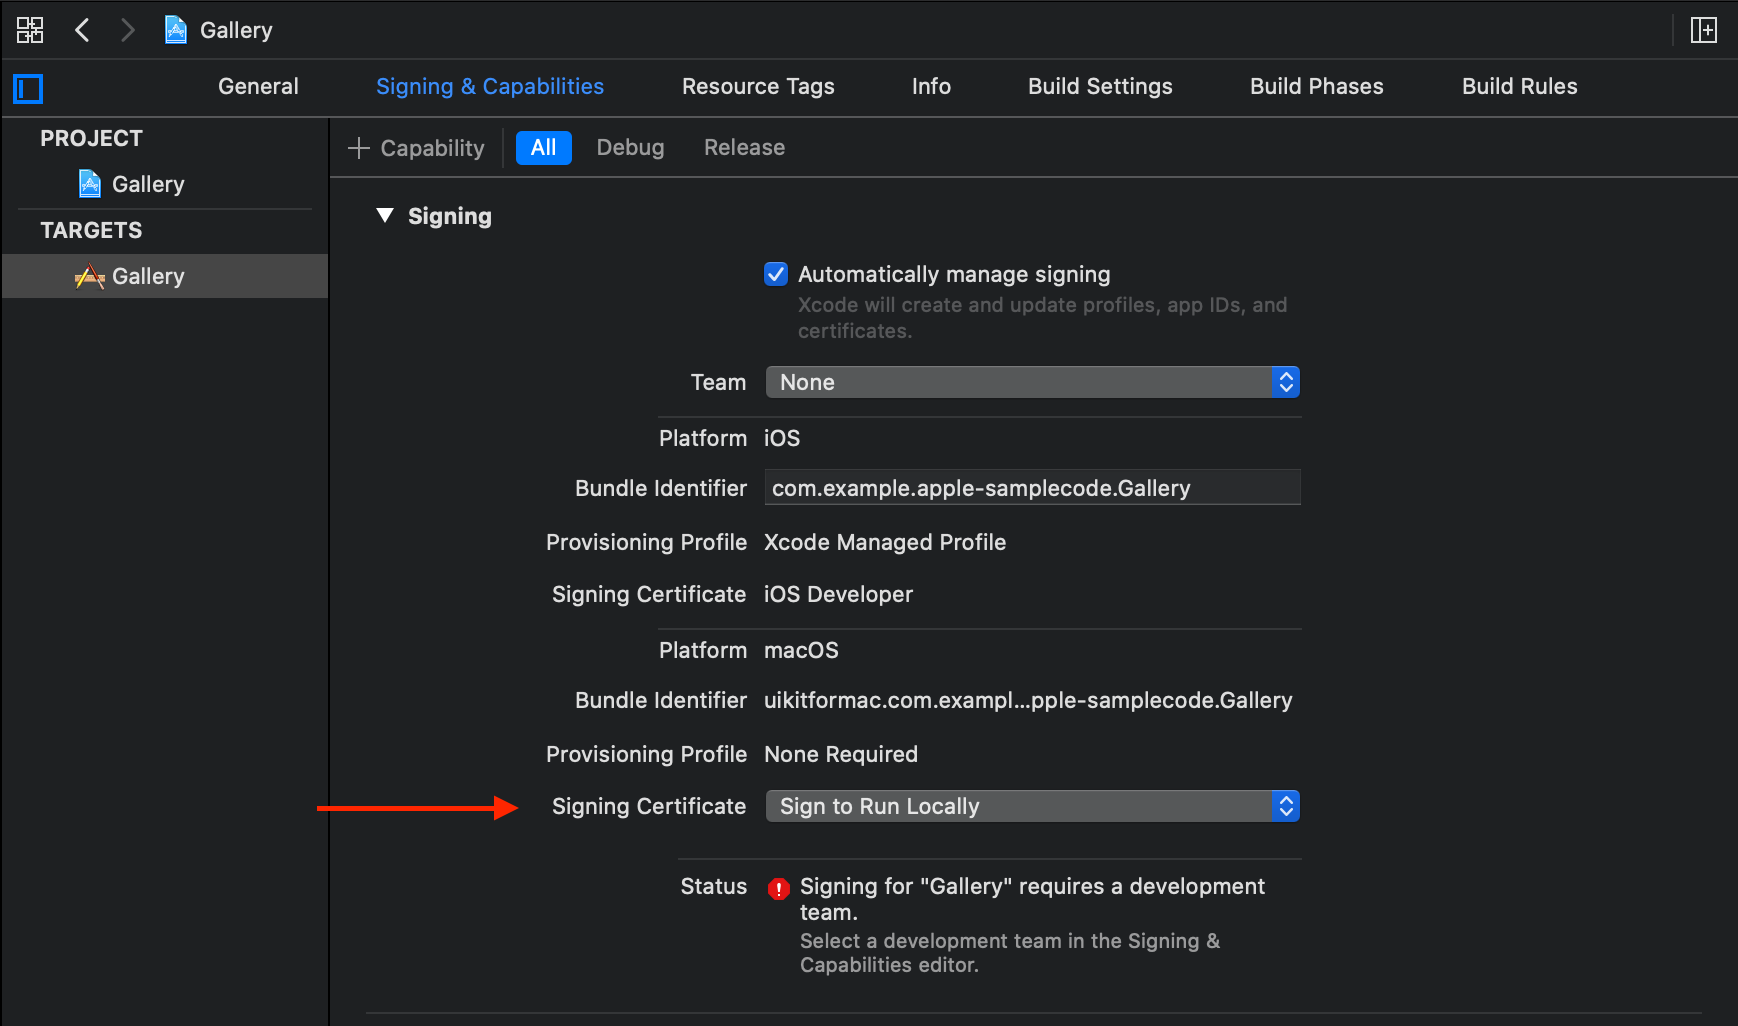
Catalyst apps, just like simulator apps, do not require signing. However, since Catalyst apps run on the real hardware, right away, they are set up for signing by default.
If you have a paid Apple Developer account, that is not a problem. However if you're a student or just looking into Catalyst, you might not have a paid Apple Developer account.
Thankfully, you can test Catalyst apps just fine without a paid account. You only have to go into the signing settings of Xcode ("Target" -> "Signing & Capabilities" -> "Signing Certificate") and then select Sign to Run Locally.
Now, Xcode will still complain with a small red alert that says "Signing for ... requires a development team", however it will build the app just fine and also run it just fine.
Signing Frameworks
If you're signing locally and your code is split up into frameworks, it may be the case that you're getting code signing errors when your binary starts. So, your code is building fine, it is sining fine, but when the Catalyst App actually starts, it will crash with a code signing error. The current known way to prevent this is to have the following settings for your main target and for your frameworks (screenshots below):
Main Target
- Automatically Manage Signing
- Team: A working account
- Signing Certificate: Apple Development

Any Framework Target
- Automatically Manage Signing
- Team: The same working account
- Signing Certificate: Sign to run locally
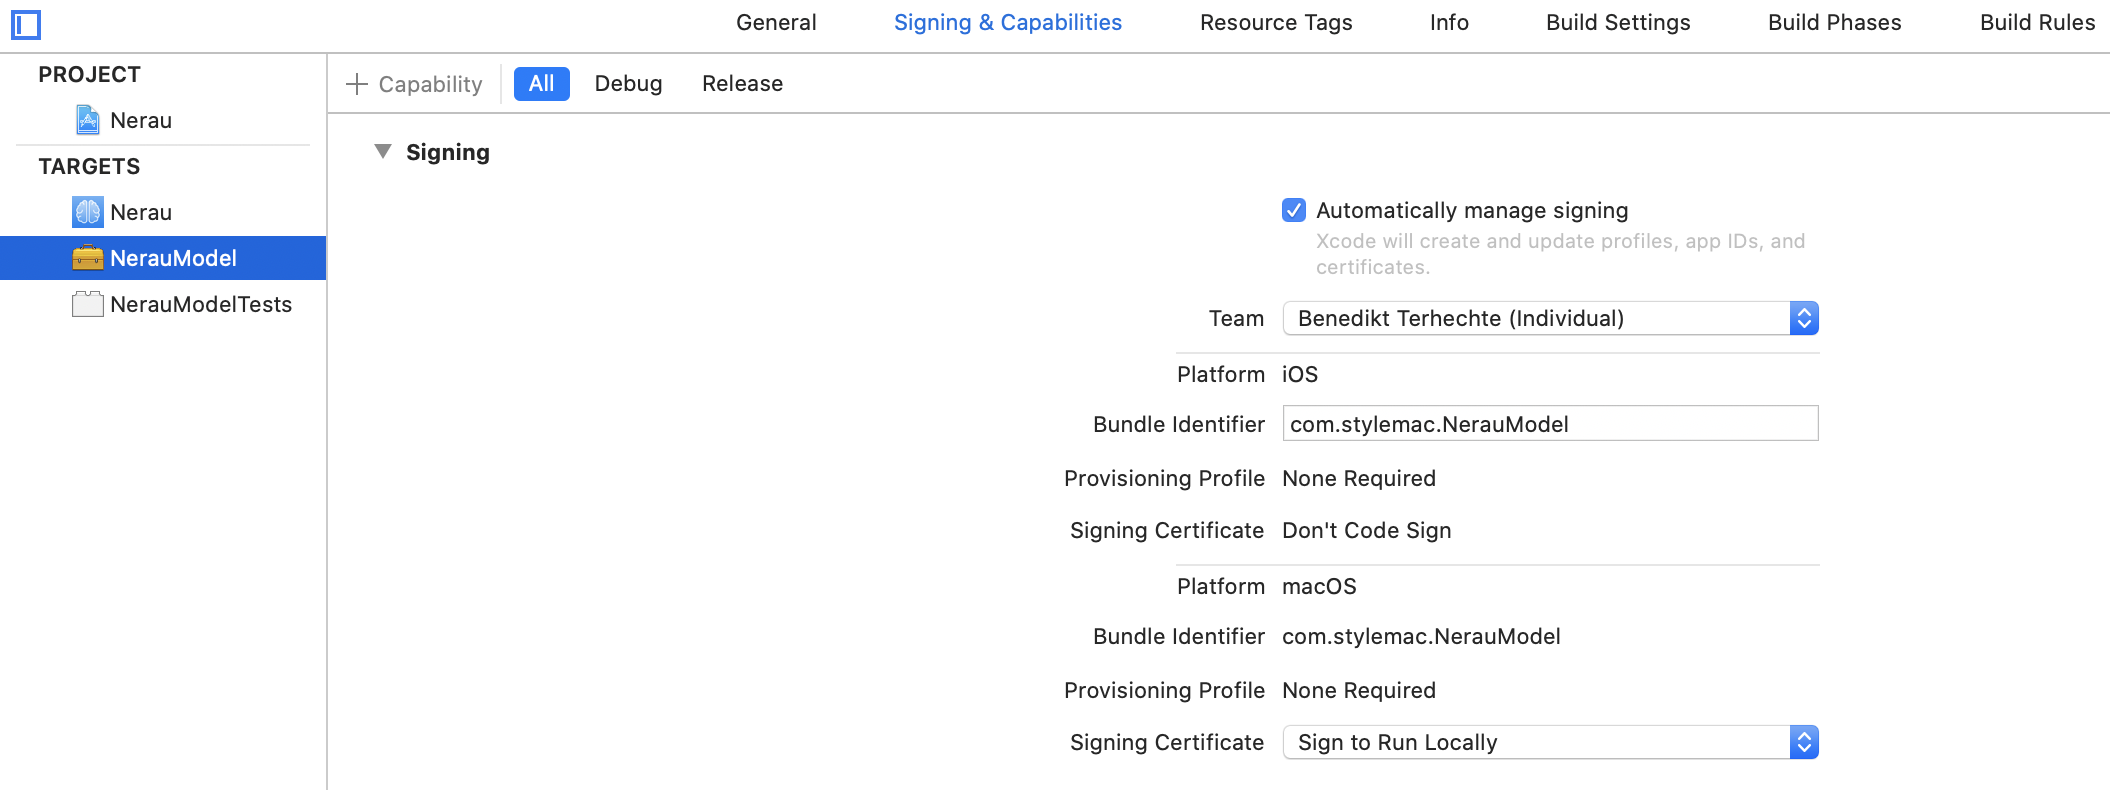
Keep in mind that the frameworks and the main target need to have distinct bundle identifiers.
This issue does appear to only happen to some people.
If you want to compile code that runs only on macOS, you can do that by using the following, new compile time attribute:
#if targetEnvironment(UIKitForMac)

   let toolbar = NSToolbar(identifier: \"MyToolbar\")

#endif
Obviously, to do it the other way around, you just inverse it:
#if !targetEnvironment(UIKitForMac)

   import ARKit

#endif
Many of the macOS specific UIKit extensions require you to use a scene delegate. If your project was created before iOS 13 and you also don't intend to use multiple windows, you can follow these steps to add a scene delegate to your project and keep the app limited to one window:
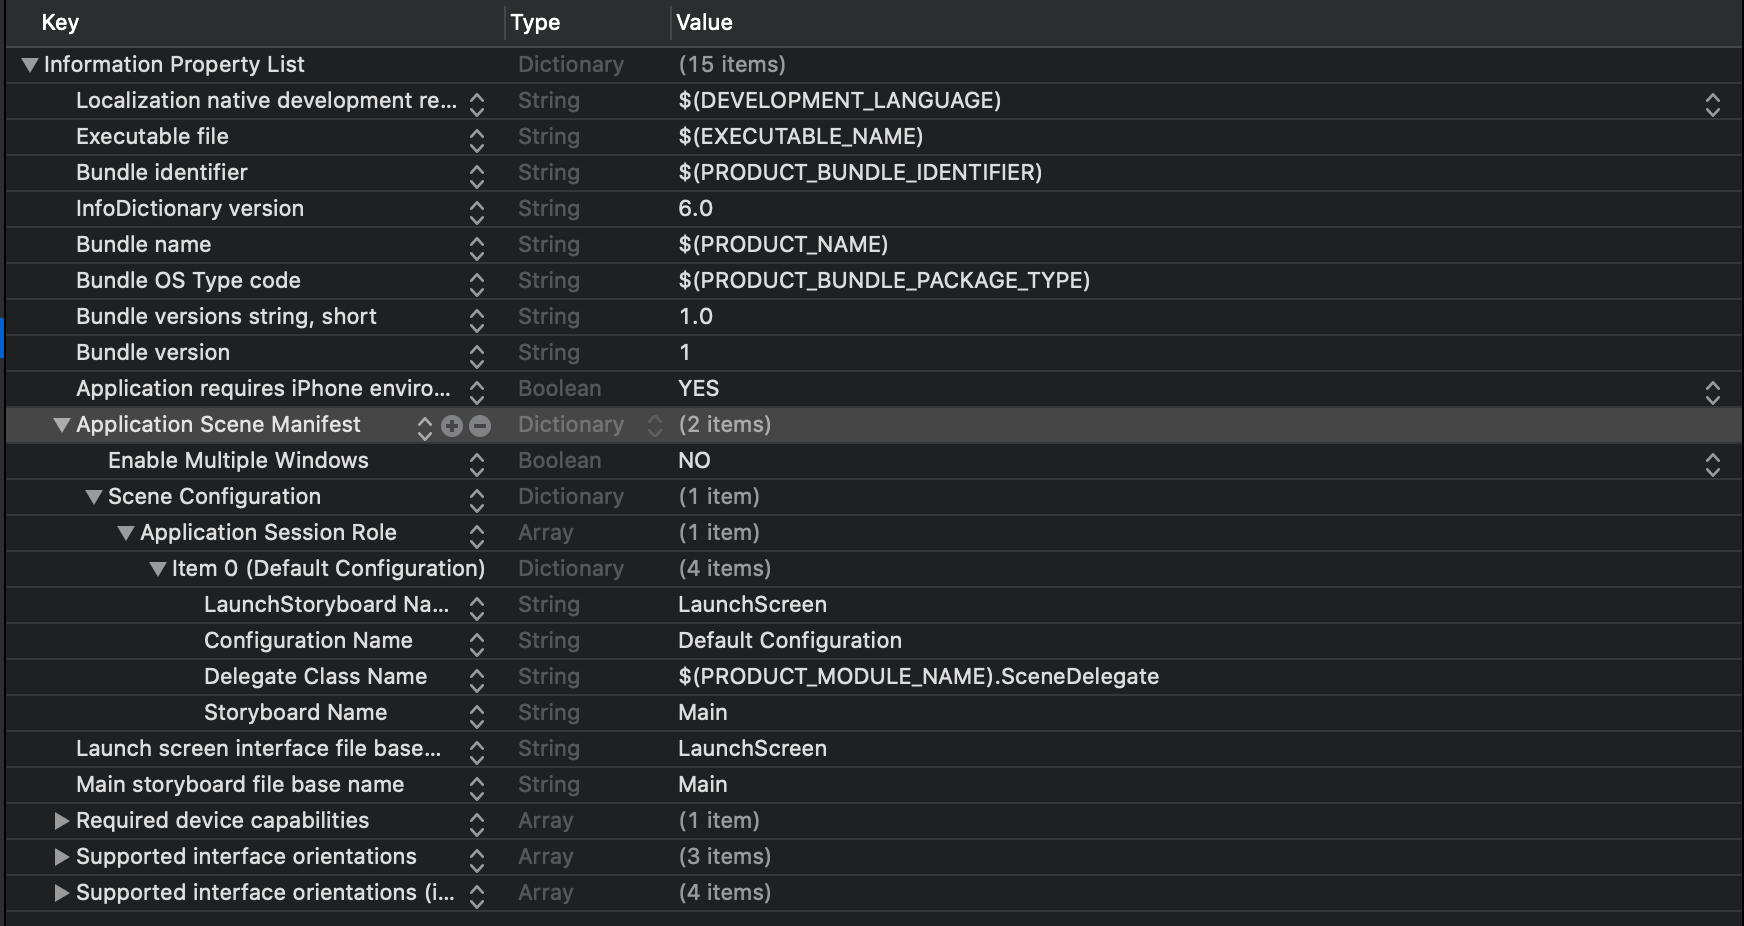
The first step is to add a scene manifest to your Info.plist. This can either be done in the Xcode plist editor or by adding the following lines to your Info.plist in source code mode (You can just keep the default names. They're fine):
UIApplicationSceneManifest
UIApplicationSupportsMultipleScenes
UISceneConfigurations
UIWindowSceneSessionRoleApplication
UILaunchStoryboardName
LaunchScreen
UISceneConfigurationName
Default Configuration
UISceneDelegateClassName
$(PRODUCT_MODULE_NAME).SceneDelegate
UISceneStoryboardFile
Main
Next, add the following two functions to your AppDelegate. Note that only one of them is used, but for posterity, it makes sense to add both in one go:
     func application(_ application: UIApplication, configurationForConnecting connectingSceneSession: UISceneSession, options: UIScene.ConnectionOptions) -> UISceneConfiguration {

         // Called when a new scene session is being created.

         // Use this method to select a configuration to create the new scene with.

         return UISceneConfiguration(name: \"Default Configuration\", sessionRole: connectingSceneSession.role)

     }


     func application(_ application: UIApplication, didDiscardSceneSessions sceneSessions: Set<UISceneSession>) {

         // Called when the user discards a scene session.

         // If any sessions were discarded while the application was not running, this will be called shortly after application:didFinishLaunchingWithOptions.

         // Use this method to release any resources that were specific to the discarded scenes, as they will not return.

     }
Finally, add a new file, SceneDelegate.swift to your project and add the following code to it:
import UIKit


class SceneDelegate: UIResponder, UIWindowSceneDelegate {


     var window: UIWindow?


     func scene(_ scene: UIScene, willConnectTo session: UISceneSession, options connectionOptions: UIScene.ConnectionOptions) {

         // Use this method to optionally configure and attach the UIWindow `window` to the provided UIWindowScene `scene`.

         // If using a storyboard, the `window` property will automatically be initialized and attached to the scene.

         // This delegate does not imply the connecting scene or session are new (see `application:configurationForConnectingSceneSession` instead).

         guard let _ = (scene as? UIWindowScene) else { return }

     }

}
By default, apple also adds the following, empty, methods to a new UIWindowSceneDelegate conforming class, but you don't necessarily need them and can always add them later:
func sceneDidDisconnect(_ scene: UIScene)

func sceneDidBecomeActive(_ scene: UIScene)

func sceneWillResignActive(_ scene: UIScene)

func sceneWillEnterForeground(_ scene: UIScene)

func sceneDidEnterBackground(_ scene: UIScene)
You can read more about them here.
Initially, this is rather simple. You just need to enable the Supports multiple windows setting for your target:
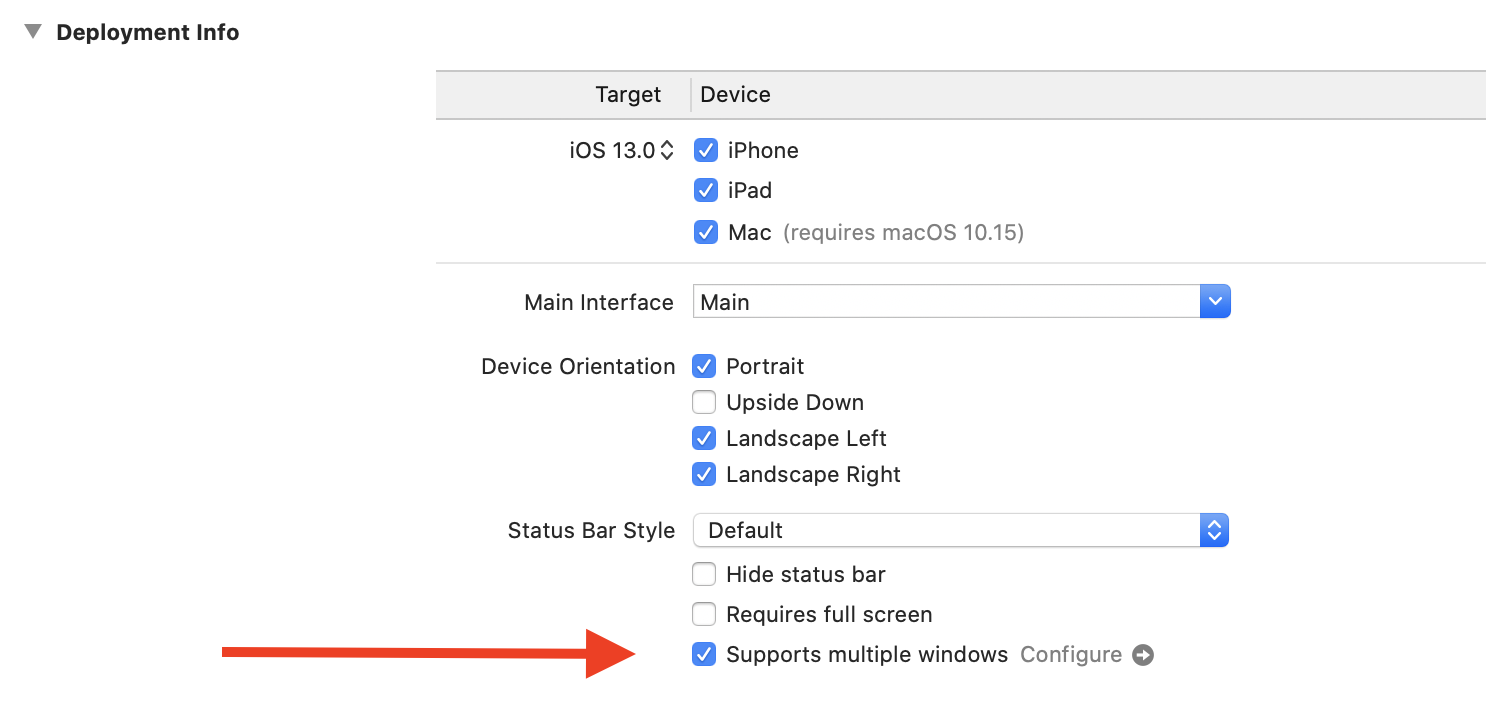
After this, if you didn't create your own MenuBar, you will have a new New Window Control + N shortcut that you can use to instantiate a new window.
If you did modify your menubar (as explained above) you can re-create the New Window shortcut by following these explanations.
Finally, if you want to support multiple different windows, that is explained here
There is one issue on beta 2 which means that you need to add a bridging header to your project and import a header file in there if you want to use the NSTouchbar or NSToolbar APIs.
- Add a new bridging header to your project, say
bridge-me.h(If you don't have a bridging header yet) - In your target Build Settings set the
Objective-C Bridging Headervalue to your new bridging header ("MyApp/bridge-me.h")
Make sure to have the right path for the bridging header.
Then, insert the following code in your bridging header:
Preparations
Note that in Beta 2 you need to manually import a special bridging header if you want to use NSToolbar. Here's how to do it.
The best way to insert toolbars is to use the new UIScene API that Apple introduced with iOS 13. The gist is that you use a SceneDelegate and in the scene:willConnectToSession:options method, you can modify a window scene's titlebar by setting a new NSToolbar on it.
If your project doesn't have a SceneDelegate yet, here's a brief primer on how to set it up.. This delegate is - as far as I'm aware - required to support toolbars.
Modifying the Scene
The first step is to modify the scene(willConnectTo:options:) method in your SceneDelegate to check if we're running UIKitForMac - after all, iOS doesn't have toolbars - and then make sure that our scene is actually a UIWindowScene:
  func scene(_ scene: UIScene, willConnectTo session: UISceneSession, options connectionOptions: UIScene.ConnectionOptions) {

         guard let windowScene = (scene as? UIWindowScene) else { return }

         #if targetEnvironment(UIKitForMac)

		#endif

}
UIWindowScene objects have a titlebar property on macOS. These UITitleBar objects are currently not documented, but the headers expose a toolbar property that you can use to assign a NSToolbar to your window:
  func scene(_ scene: UIScene, willConnectTo session: UISceneSession, options connectionOptions: UIScene.ConnectionOptions) {

         guard let windowScene = (scene as? UIWindowScene) else { return }

         #if targetEnvironment(UIKitForMac)

		// Create a new toolbar (see below)

		let newToolbar = makeMyFancyToolbar()


		// Insert it into the titlebar

		windowScene.titlebar.toolbar = self


		// Hide the window title, looks nicer

		windowScene.titlebar.titleVisibility = .hidden

		#endif

}
So this is how we insert an actual toolbar into our window. The last remaining step is to create such a toolbar, so how does that work?
Creating a Toolbar
This is actually a multi-step process as toolbars are quit versatile. You begin by instantiating a new toolbar and configuring it accordingly:
// Create the toolbar

let toolbar = NSToolbar(identifier: \"MyFancyToolbar\")


// Assign the delegate

toolbar.delegate = self
As you can see, the configuration is just two lines of code (for now) but toolbars employ a delegate that you can leverage to configure them in much more detail. Lets see how.
Implementing the NSToolbarDelegate protocol
First, you need an object that can conform to your toolbar delegate. For simplicity, lets just take our SceneDelegate. However, this can be any object and for more complex setups could be, for example, your own MyToolbarController class.
#if targetEnvironment(UIKitForMac)

extension SceneDelegate: NSToolbarDelegate {

}

#endif
Again, make sure this code only compiles on macOS. Next, lets implement the bare minimum needed to display a toolbar.
Toolbars are versatile and allow your users to configure them and modify their contents. Our toolbar will just display a button on the right side. Toolbars identify their contents via toolbar identifiers of type NSToolbarItem.Identifier. Each item in the toolbar has a custom identifier. This makes it easy for the system to understand which items are in the toolbar, which can be customized, removed, etc. So in order for us to add a button, we need an identifier for our button:
private let OurButtonToolbarIdentifier = NSToolbarItem.Identifier(rawValue: \"OurButton\")


#if targetEnvironment(UIKitForMac)

extension SceneDelegate: NSToolbarDelegate {

}

#endif
Next, we need to implement two methods that are called on the delegate to figure out what to display in the toolbar:
toolbarDefaultItemIdentifiers: This returns the identifiers for the items that should be in the toolbar by defaulttoolbarAllowedItemIdentifiers: This returns the identifiers that are currently allowed in the toolbar
We will implement default first:
extension SceneDelegate: NSToolbarDelegate {

     func toolbarDefaultItemIdentifiers(_ toolbar: NSToolbar) -> [NSToolbarItem.Identifier] {

         return [NSToolbarItem.Identifier.flexibleSpace,

                 OurButtonToolbarIdentifier]

     }

}
Here, we're returning an array of two items. The last is our OurButtonToolbarIdentifier. The first is a "flexible space" identifier that will consume as much horizontal space as possible, thus pushing our button all the way to the right.
For simplicity, the second method, toolbarAllowedItemIdentifiers just calls the first one.
extension SceneDelegate: NSToolbarDelegate {

     func toolbarDefaultItemIdentifiers(_ toolbar: NSToolbar) -> [NSToolbarItem.Identifier] {

         return [NSToolbarItem.Identifier.flexibleSpace,

                 OurButtonToolbarIdentifier]

     }

     func toolbarAllowedItemIdentifiers(_ toolbar: NSToolbar) -> [NSToolbarItem.Identifier] {

         return toolbarDefaultItemIdentifiers(toolbar)

     }

}
Now that we told the toolbar how to display itself, we just need to create those items (in our case just our button):
extension SceneDelegate: NSToolbarDelegate {

     func toolbar(_ toolbar: NSToolbar, itemForItemIdentifier itemIdentifier: NSToolbarItem.Identifier, willBeInsertedIntoToolbar flag: Bool) -> NSToolbarItem? {

         if (itemIdentifier == OurButtonToolbarIdentifier) {

		    let barButtonItem = UIBarButtonItem(barButtonSystemItem: UIBarButtonItem.SystemItem.add,

		                          target: self,

					  action: #selector(self.myFancyAction(sender:)))

             let button = NSToolbarItem(itemIdentifier: itemIdentifier, barButtonItem: barButtonItem)

             return button

         }

         return nil

     }
Again, this is simple enough. We just create a UIBarButtonItem, wrap it into a NSToolbarItem and return it. There're a lot of options here that we will not go into, but reading the headers and the documentation will help you along if you need more complex setups.
If you want to hide your existing iOS / UIKit toolbar, too, have a look at this section.
If you want to display a nice segmented control your toolbar, like this:

There's an explanation on how to do this in the following section.
Here's the whole code SceneDelegate in one section:
import UIKit


class SceneDelegate: UIResponder, UIWindowSceneDelegate {


     var window: UIWindow?


     func scene(_ scene: UIScene, willConnectTo session: UISceneSession, options connectionOptions: UIScene.ConnectionOptions) {

         guard let windowScene = (scene as? UIWindowScene) else { return }


         #if targetEnvironment(UIKitForMac)

         if let titlebar = windowScene.titlebar {

             titlebar.titleVisibility = .hidden

             titlebar.toolbar = makeMyFancyToolbar()

         }

         #endif

     }


     private func makeMyFancyToolbar() -> NSToolbar {

         let toolbar = NSToolbar(identifier: \"MyToolbar\")

         toolbar.delegate = self

         return toolbar

     }


     @objc func myFancyAction(sender: UIBarButtonItem) {

         print(\"Button Pressed\")

     }

}


#if targetEnvironment(UIKitForMac)


private let OurButtonToolbarIdentifier = NSToolbarItem.Identifier(rawValue: \"OurButton\")


extension SceneDelegate: NSToolbarDelegate {

     func toolbar(_ toolbar: NSToolbar, itemForItemIdentifier itemIdentifier: NSToolbarItem.Identifier, willBeInsertedIntoToolbar flag: Bool) -> NSToolbarItem? {

         if (itemIdentifier == OurButtonToolbarIdentifier) {

             let barButton = UIBarButtonItem(barButtonSystemItem: .add, target: self, action: #selector(myFancyAction(sender:)))

             let button = NSToolbarItem(itemIdentifier: itemIdentifier, barButtonItem: barButton)

             return button

         }

         return nil

     }


     func toolbarDefaultItemIdentifiers(_ toolbar: NSToolbar) -> [NSToolbarItem.Identifier] {

         return [NSToolbarItem.Identifier.flexibleSpace, OurButtonToolbarIdentifier]

     }


     func toolbarAllowedItemIdentifiers(_ toolbar: NSToolbar) -> [NSToolbarItem.Identifier] {

         return toolbarDefaultItemIdentifiers(toolbar)

     }

}

#endif
Sidebars are a staple of macOS. Many apps on macOS have sidebars and use them to support a huge variety of usage scenarios. Apple added sidebar support right into Catalyst. By default, any Master-Detail view implemented using the UISplitViewController will inhibit macOS sidebar behaviour. However, if you just do that, the sidebar contents (that is, the Master part of the Master Detail View) will look strangely out of place. The rows still look like normal UIKit Rows:
Thankfully, this can easily be fixed. Apple offers a new property on the UISplitViewController:
// The background style of the primary view controller.

@available(iOS 13.0, *)

open var primaryBackgroundStyle: UISplitViewController.BackgroundStyle
If you're on Catalyst, you can set this to .sidebar in order to get the macOS native sidebar look and feel from the right side of the screenshot above:
primaryBackgroundStyle = .sidebar
In the WWDC slides and the sample code, Apple touts a buildCommands method on UIResponder for menus. However, this was deprecated with beta 1. Instead, we should use buildMenu(with:). This currently lacks documentation though.
It seems, currently, the best way to modify the Menubar (or, MainMenu) is by using storyboards and dropping a Main Menu into your storyboard. This new scene will be just like the default menu, but you can edit it.
Preparations
Note that in Beta 2 you need to manually import a special bridging header if you want to use touchbars. Here's how to do it.
With that out of the way, lets have a brief look at touchbars. Apple's documentation for the NSTouchBar class is fantastic and it would be a waste to try to replicate all that documentation here. Also, touchbars in Catalyst apps work just like the AppKit touchbars. So all the available NSTouchBar tutorials work just as well for your iPad app.
In brief, touchbars work as follows: Each controller in the responder chain is asked whether he has a touchbar that he wants to display via the func makeTouchBar() -> NSTouchBar? method on UIResponder (or NSResponder). The higher up items in the responder chain have priority. Within that method, you return a fully configured touchbar with a proper NSTouchBarDelegate set. The NSTouchBarDelegate allows you to configure the touchbar to your hearts contents. Here's a simple example:
Make sure to remember that touchbars only appear for objects that conform to UIResponder and are in the responder chain. A good place for this code is your UIViewController that is currently being displayed.
// Define the items we want to display in the touch bar via specific identifiers, so UIKit can track them

let MyButtonTouchBarIdentifier = NSTouchBarItem.Identifier(rawValue: \"MyButton\")


class MyViewController: UIViewController {

     override func makeTouchBar() -> NSTouchBar? {

         let touchBar = NSTouchBar()

         touchBar.delegate = self

         touchBar.defaultItemIdentifiers = [MyButtonTouchBarIdentifier,

                                            NSTouchBarItem.Identifier.otherItemsProxy]

         return touchBar

     }


     @objc func buttonPressed(sender: NSTouchBarItem) {

     }

}

extension MacSplitViewController: NSTouchBarDelegate {


     func touchBar(_ touchBar: NSTouchBar, makeItemForIdentifier identifier: NSTouchBarItem.Identifier) -> NSTouchBarItem? {

         switch identifier {

         case MyButtonTouchBarIdentifier:

             return NSButtonTouchBarItem.init(identifier: identifier,

                                              title: \"Press Me\",

                                              target: self,

                                              action: #selector(self.buttonPressed))

         default: return nil

         }

     }

}
Using Apple HIG TouchBar Images
Apple has a very nice set of default touchbar images outlined here:
- https://developer.apple.com/design/human-interface-guidelines/macos/touch-bar/touch-bar-icons-and-images/
- https://developer.apple.com/documentation/appkit/nstouchbaritem?language=objc
These currently can't be used in Catalyst apps (FB6312494).
Context Menus in Catalyst are implemented via the new UIContextMenuInteraction API that Apple shipped on iOS as part of iOS 13.. They work hand in hand with menu and shortcut system that is documented here.
If you support context menus with UIContextMenuInteraction, they will automatically convert into right click context menus in your Catalyst app. Here's a simple example of how that works in action:
For simplicity, UITableView (and also UICollectionView) have new delegate methods that allow you to return a UIContextMenuInteraction instance that will be used for 3D touch or long presses on iOS or context menus on macOS. Here is an example of a very simple menu that has two entries "Move Priority Up" and "Move Priority Down":
extension MyViewController: UITableViewDelegate {

     public override func tableView(_ tableView: UITableView, contextMenuConfigurationForRowAt indexPath: IndexPath, point: CGPoint) -> UIContextMenuConfiguration? {

         // Action providers are closures that generate action menus. They are called lazily only

		// when the menu is actually invoked.

         let actionProvider: ([UIMenuElement]) -> UIMenu? = { _ in

             let upAction = UIAction(__title: \"Move Priority Up\",

                                     image: UIImage(systemName: \"square.and.arrow.up\"))

             { [weak self] _ in

                 self?.changePriority(.up, indexPath)

             }

             let downAction = UIAction(__title: \"Move Priority Down\",

                                       image: UIImage(systemName: \"square.and.arrow.down\"))

             { [weak self] _ in

                 self?.changePriority(.down, indexPath)

             }


		    let actions = [upAction, downAction]


             // We generate a new menu with our two actions

             return UIMenu(__title: \"Actions\", image: nil, identifier: nil, children: actions)

         }


		// A context menu can have a `identifier`, a `previewProvider`,

		// and, finally, the `actionProvider that creates the menu

         return UIContextMenuConfiguration(identifier: nil,

                                           previewProvider: nil,

                                           actionProvider: actionProvider)

     }

}
That's all you need to support context menus in your tableView. For more complex use cases, refer to the detailed documentation on menus:, and on UIContextMenuInteraction
Keyboard shortcuts are implemented via the existing UIKeyCommand system on UIResponder. Here's a simple example of how your currently visible view controller can listen for Escape key presses by the user:
class MyKeyListeningViewController: UIViewController {

     override var keyCommands: [UIKeyCommand]? {

         return [UIKeyCommand(input: UIKeyCommand.inputEscape,

                              modifierFlags: [],

                              action: #selector(doCancelCommand(sender:)))

         ]

     }

}
Keep in mind that on macOS multiple views can easily be visible at the same time and the rules of the responder chain apply.
In order to implement the preferences or your app, Apple supports the Settings.bundle technology that has been there since iOS 2.0 (or rather, iPhoneOS 2.0). The documentation is actually so old, that it is archived and the documentation screenshots look like this:
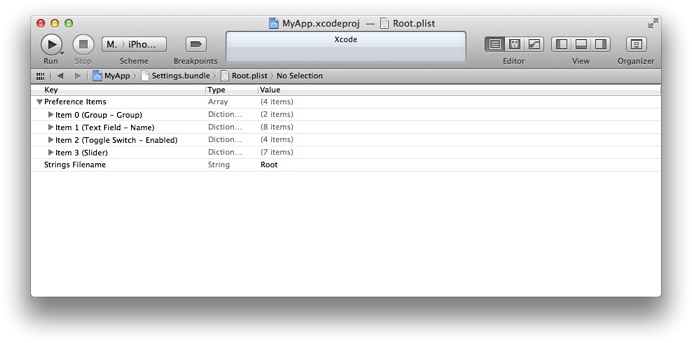
On iOS, this means that you just need to add a new bundle target to your project and fill it with a collection of specially crafted Plist files. These settings then appear in the general iOS settings and any changes done there are stored in the NSUserDefaults.
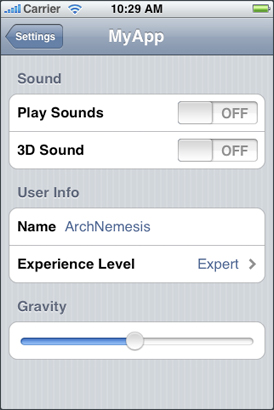
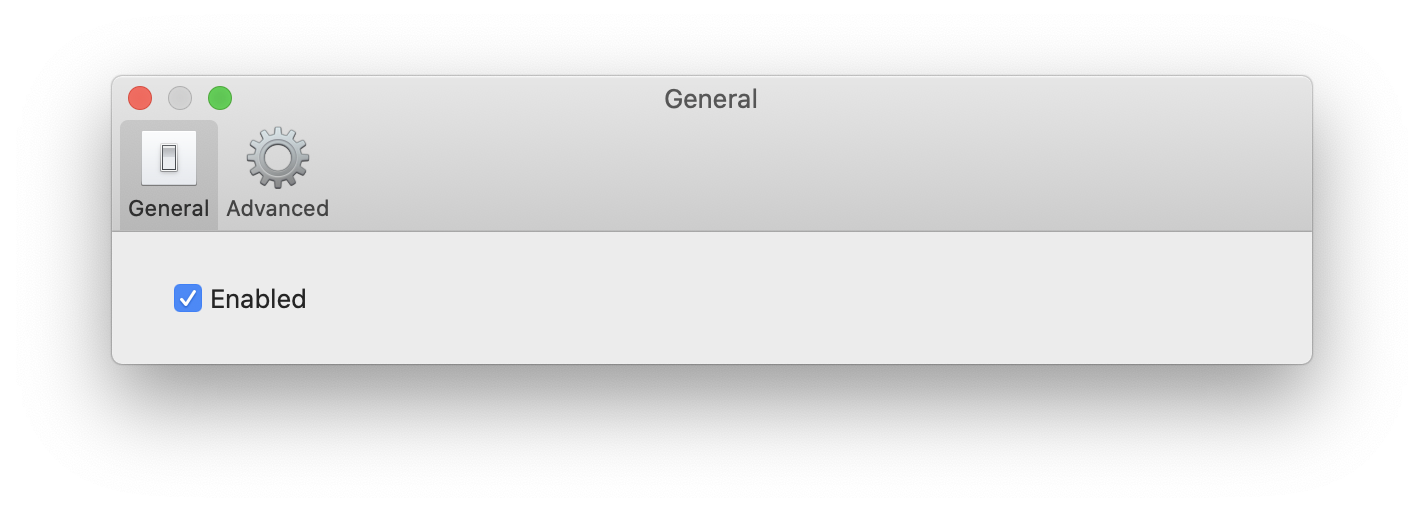
If your app supports settings bundles, then your Catalyst app will automatically add a Preferences window to your app that looks something like this:
For details on how to achieve this, refer to Apples documentation.
Now, if you have more involved logic in your settings, special view controllers, web views, and other things, then this doesn't work well for you. In that case, you can read here how to implement more complex preferences on macOS.
Preferences with a Toolbar
Now, one thing you might wonder is how to get this wonderful Preferences Toolbar, that Apple has in their Podcast app (see the last screenshot). As it turns out, this is currently completely undocumented, and we're explaining the details of how to achieve this here.
Catalyst requires new builds of your third party frameworks and SDKs. The iOS or Simulator builds are not appropriate. This means that until your third party, closed source advertising or tracking library offers a new release with an added UIKitForMac target, you won't be able to build your app.
As a temporary solution, if you wrapped all these dependencies in a wrapper, you can just use conditional compilation to just not ship them on macOS.
A brief list of notable differences
- The bundle identifier for the macOS version of your app is different. If you use bundle identifiers for something specific, be aware of this
- KeyChain sharing differs briefly, as outlined by Apple here (search for "macOS" on that page)
- Custom multitouch behaviour can't be automated. Views have to be updated for that
- Your app will not be killed if it consumes too much memory. The system will just swap
With Catalyst, you should use the newever versions of these old, deprecated, frameworks:
- AddressBook -> Contacts
- AddressBookUI -> ContactsUI
- AssetsLibrary -> Photos
- OpenGL ES -> Metal
- GLKit -> MetalKit
- UIWebView -> WKWebView
Catalyst is still a fresh technology. So far, based on our current knowledge, the following best practices have emerged:
- Try to use conditional compilation (via
#if targetEnvironment(UIKitForMac) sparringly - Your view redraw code should be fast as macOS users frequently resize windows (in a dynamic manner)
- Have proper autolayout support for bigger and smaller sizes as windows can be resized in a variety of ways
- Be aware of the responder chain as multiple view controllers can be on the screen at the same time
- Your app can run forever, memory leaks can pile up
These guidelines are based on information that Apple shared in different WWDC keynotes
- Most Important: Apple has Human Interface Guidelines for iPad Apps for Mac
- Macs don't have dynamic type. Everything is "Large"
- Mac users have many windows open. Therefore you should set focus on the contents of the window. This means using less color so that the contents can shine
- Use side bars and toolbars instead of a UITabBar
- Try to take advantage of the bigger macOS windows. You can utilize different layouts and use the space wisely
- Default font size on macOS is 13pt compared to 17pt on iOS. This is handled automatically for you though, as each app is scaled to 77% of its actual size
This is a list of not-so-obvious things which you might run into while working on your Catalyst app. Will be extended constantly.
Once you modify your Main Menu, you will find that the entry to create a new window has suddenly disappeared. That happens because the New Window entry is dynamicaly inserted by UIKit depending on whether your app supports multiple windows (or not).
In order to support this again, you have to do the following:
- Create a new
UICommandin your Storyboard for theNew Windowentry. - Assign the title and your desired shortcut (probably Command + N).
- Select the
First Responderin yourMainMenu Scene
- Switch to the Attributes Inspector (from the inspectors on the right)
- There, you will find an empty list named "User Defined"
- Add a new entry to this list with the following attributes:
- Action:
requestNewScene:, Type:id(the default) - Finally, drag from your
UICommandmenu entry to the First Responder and select the newly created action.
A segmented control is a convenient replacement for the iOS tabbar, as it also groups related segments and only allows one of them to be active.
It is basically just another type of NSToolbarItem. Thus, the process is very similar to how you set up a toolbar with elements before.
- Define a identifier
- Return the identifiers
- For the new identifier, return a segmented control
- Set up an action and target for the segmented control
As a bonus point, you can tell the toolbar that the segmented control should be the centered item in the toolbar (much like with a tabbar).
In this example, we also have a UITabBar that we're hiding, so that the switching of the visible view controller is still handled by the hidden tabbar.
Here is the necessary code:
class SceneDelegate: UIResponder, UIWindowSceneDelegate, NSToolbarDelegate {


     // We need a toolbar identifier

     static let SegmentedItemToolbarIdentifier = NSToolbarItem.Identifier(rawValue: \"PrimaryGroup\")


     func scene(_ scene: UIScene, willConnectTo session: UISceneSession, options connectionOptions: UIScene.ConnectionOptions) {

         #if targetEnvironment(UIKitForMac)

         if let windowScene = scene as? UIWindowScene {

             if let titlebar = windowScene.titlebar {

                 let toolbar = NSToolbar(identifier: \"NerauToolbar\")


                 let rootViewController = window?.rootViewController as? UITabBarController

			// Hide the tabbasr

                 rootViewController?.tabBar.isHidden = true


                 toolbar.delegate = self


			// Our segmented control should be centered


                 toolbar.centeredItemIdentifier = SceneDelegate.SegmentedItemToolbarIdentifier

                 titlebar.titleVisibility = .hidden


                 titlebar.toolbar = toolbar

             }

         }

         #endif

     }


     func toolbar(_ toolbar: NSToolbar, itemForItemIdentifier itemIdentifier: NSToolbarItem.Identifier, willBeInsertedIntoToolbar flag: Bool) -> NSToolbarItem? {

             if (itemIdentifier == SceneDelegate.SegmentedItemToolbarIdentifier) {

		        // Create a new group item that hosts two buttons

                 let group = NSToolbarItemGroup(itemIdentifier: SceneDelegate.SegmentedItemToolbarIdentifier,

                                                titles: [\"Startpage\", \"Categories\"],

                                                selectionMode: .selectOne,

                                                labels: [\"section1\", \"section2\"],

                                                target: self,

                                                action: #selector(toolbarGroupSelectionChanged))


			// Set the initial selection

                 group.setSelected(true, at: 0)


                 return group

             }

     	return nil

     }


     @objc func toolbarGroupSelectionChanged(sender: NSToolbarItemGroup) {

         // This is called when the user changes the selection

		// Notice how we get the tab bar controller and change the selection there

         let rootViewController = window?.rootViewController as? UITabBarController

         rootViewController?.selectedIndex = sender.selectedIndex

     }


     func toolbarDefaultItemIdentifiers(_ toolbar: NSToolbar) -> [NSToolbarItem.Identifier] {

         return [SceneDelegate.SegmentedItemToolbarIdentifier,

                 NSToolbarItem.Identifier.flexibleSpace]

     }


     func toolbarAllowedItemIdentifiers(_ toolbar: NSToolbar) -> [NSToolbarItem.Identifier] {

         return self.toolbarDefaultItemIdentifiers(toolbar)

     }

}
If you want to hide your iOS tabbar, just as you're displaying your macOS toolbar, this is what you can do in your SceneDelegate:
     func scene(_ scene: UIScene, willConnectTo session: UISceneSession, options connectionOptions: UIScene.ConnectionOptions) {

         #if targetEnvironment(UIKitForMac)

         if let windowScene = scene as? UIWindowScene {

             if let titlebar = windowScene.titlebar {

                 let toolbar = NSToolbar(identifier: \"NerauToolbar\")


                 let rootViewController = window?.rootViewController as? UITabBarController

                 rootViewController?.tabBar.isHidden = true


                 toolbar.delegate = self

                 titlebar.titleVisibility = .hidden


                 titlebar.toolbar = toolbar

             }

         }

         #endif

     }
Preparations
Note that in Beta 2 you need to manually import a special bridging header if you want to modify the title. Here's how to do it.
The way to modify window titlebars is to use the UIScene API introduced with iOS 13. The gist is that you use a SceneDelegate and in the scene:willConnectToSession:options method, you can modify a window scene's titlebar.
If your project doesn't have a SceneDelegate yet, here's a brief primer on how to set it up.. This delegate is - as far as I'm aware - required to support toolbars.
UIWindowScene objects have a titlebar property on macOS. These UITitleBar objects are currently not documented, but the headers expose several properties:
  func scene(_ scene: UIScene, willConnectTo session: UISceneSession, options connectionOptions: UIScene.ConnectionOptions) {

         guard let windowScene = (scene as? UIWindowScene) else { return }

         #if targetEnvironment(UIKitForMac)

		windowScene.titlebar.titleVisibility = .hidden

		#endif

}
Apple has a very nice set of default touchbar images outlined here:
- https://developer.apple.com/design/human-interface-guidelines/macos/touch-bar/touch-bar-icons-and-images/
- https://developer.apple.com/documentation/appkit/nstouchbaritem?language=objc
These currently can't be used in Catalyst apps (FB6312494).
The documentation states that you just need to call setNeedsTouchBarUpdate() in order for the touch bar to be updated. However, as of beta 2, this does not work yet. A reliable way of achieving this is to just reset the touchBar property on UIResponder subclasses (like UIViewController) with the updated touchbar:
     // Adding `self.` everywhere to make it clear where it lives in this example

     @objc func doChangeState(sender: Any) {

         self.state = self.state + 1

         self.touchBar = self.makeTouchBar()

     }
If you have multiple view controllers in your responder chain that each want to insert something in your NSTouchBar you can simply define the outermost (highest priority) touchbar to host other touchbars alongside. You do that by adding the system default NSTouchBarItem.Identifier.otherItemsProxy to your list of defaultItemIdentifiers:
     override func makeTouchBar() -> NSTouchBar? {

         let touchBar = NSTouchBar()

         touchBar.delegate = self

         touchBar.defaultItemIdentifiers = [MyButtonTouchBarIdentifier,

                                            NSTouchBarItem.Identifier.otherItemsProxy]

         return touchBar

     }
Now, if, say, a child view controller would also implement makeTouchBar, its touchbar would be displayed next to our MyButtonTouchBarIdentifier button.
Drag and drop is implemented via the same mechanisms that also support drag and drop on iOS. Below, you can see an example of a simple UIViewContoller that allows droping JSON files onto the application in order to import them.
/// This is the identifier of a JSON File

private let JSONTypeIdentifier = \"public.json\"


extension MyDragAndDropSupportingViewController: UIDropInteractionDelegate {

     func dropInteraction(_ interaction: UIDropInteraction,

                          canHandle session: UIDropSession) -> Bool {

		// We tell the drag and drop system that we support JSON

         return session.hasItemsConforming(toTypeIdentifiers: [JSONTypeIdentifier])

     }


     func dropInteraction(_ interaction: UIDropInteraction, sessionDidUpdate session: UIDropSession) -> UIDropProposal {

         // If a drag comes in, we copy the file. We don't want to consume it.

         return UIDropProposal(operation: .copy)

     }


     func dropInteraction(_ interaction: UIDropInteraction, performDrop session: UIDropSession) {

         // This is called with an array of NSURL

		session.loadObjects(ofClass: URL.self) { urls in

             for url in urls {

                 importJSONData(from: url)

             }

         }

     }

}
As with other Catalyst technologies, there is a lot of good Apple documentation for this as this is the same as on iOS.
For these actions, you can use the UIDocumentPickerViewController or UIDocumentBrowserViewController controllers. Here is a quick example of using a UIDocumentPickerViewController to allow the user to export JSON data to disk.
Note, in order for this to work, you need to have the "User Selected File" permission in the macOS sandbox set to Read or Read/Write depending on your use case.
func exportJSONData(_ data: Data) {

    let filename = \"Export.json\"


    // Get a path in our document directory to temporarily store the data in

    guard let exportURL = FileManager.default

            .urls(for: .documentDirectory, in: .userDomainMask)

            .first?.appendingPathComponent(filename) else { return }


    // Write the data out into the file

    try? data.write(to: exportURL)


    // Present the save controller. We've set it to `exportToService` in order

    // to export the data

    let controller = UIDocumentPickerViewController(url: filePath, in: UIDocumentPickerMode.exportToService)

    present(controller, animated: true) {

        // Once we're done, delete the temporary file

        try? FileManager.default.removeItem(at: filePath)

    }

}
Similarly, for importing data, you would use .import as in:
let controller = UIDocumentPickerViewController(url: filePath, in: .import)
The macOS sandbox is a system that allows you to define which operating system services your app target is allowed to use. Here's a list of the available options:
- Incoming Connections: Your app is a server
- Outgoing Connections: Your app is a client (i.e. read anything from network)
- Camera access
- Audio Input
- USB
- Printing
- Bluetooth
- Accessing the users' Contacts
- Accessing the users' Location
- Accessing the users' Calendar
- File access to various user locations
If you do not set these entitlements on your app, then you code is not allowed to access these services, and the app will crash or error when you try to do so.
The sandbox is enabled automatically once you enable a Catalyst target on your iPad app. The settings can be found in the "Signing & Capabilities" section and look like this:
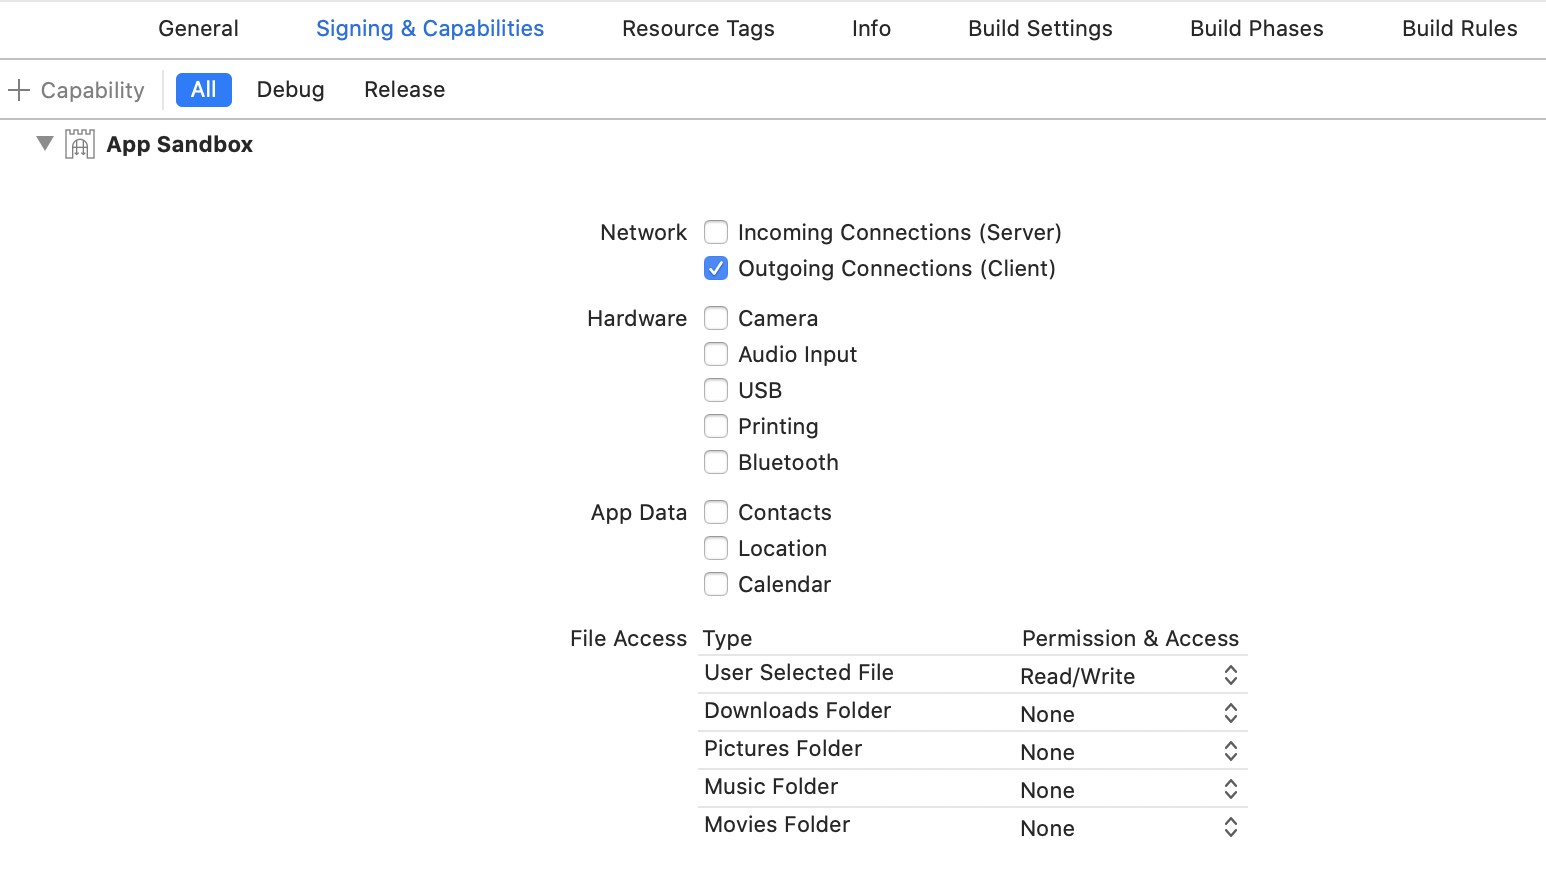
Please note that the sandbox is not mandatory on macOS. You can disable it and then your app has much more leeway in what it can do on a users system. However, it is required if you want to ship your app on the macOS App Store.
Dark mode works just as the Dark Mode on iOS 13. If your app supports dark mode on iOS 13 (i.e. semantic colors and so on) then dark mode will also work on macOS.
How do I setup the a new scene?
A new scene needs a new, different scene configuration. The creation of scene configurations
First, you have to define a user activity and tell your application in the info.plist to accept it by adding it to the list of user activities:

Then, you need to define a new scene configuration in your plist:
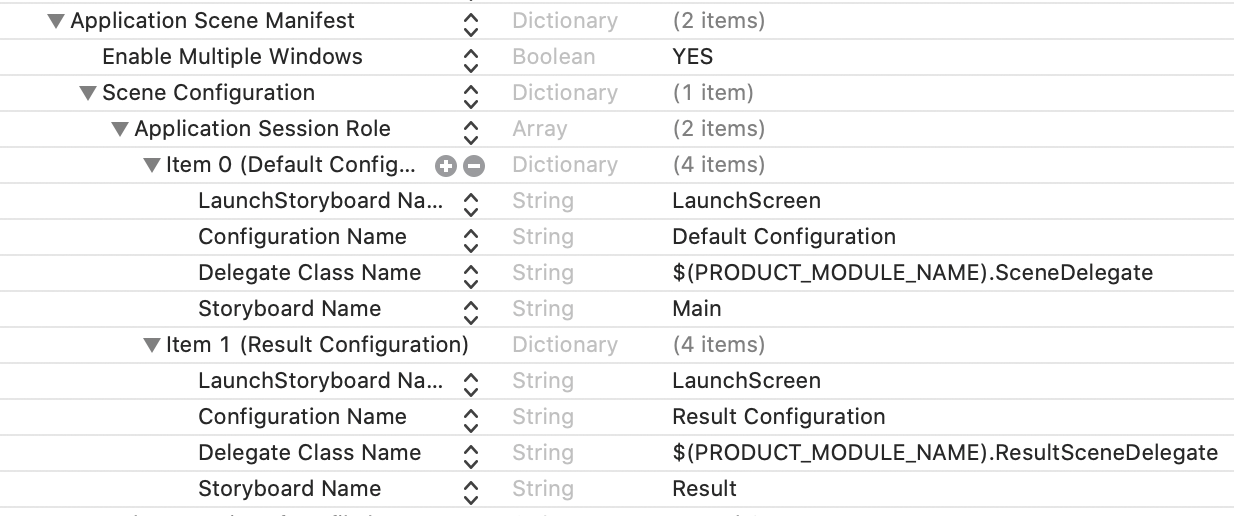
Here you have the chance to load a different storyboard. Because, after all, we want the new window to be a different window. So it should also be a different storyboard.
Next up, say we have a button that you can click in order to spawn the new window. This is what you do:
let userActivity = NSUserActivity(activityType: \"com.stylemac.nerau.openResult\")


// If you need custom data for your new window initialization, you can

// put it into the userInfo here

userActivity.userInfo = [\"userid\": 1234]


UIApplication.shared.requestSceneSessionActivation(nil, userActivity: userActivity, options: nil) { (e) in

   // If we happen to have an error

   print(\"error\", e)

}
So, what's happening here. We create a new user activity. We told UIApplication to initialize a new scene with that activity. The activity can include an additional payload for the new window (user id, etc)
Finally, we need to tell the system that this new scene that we're creating should use the other scene configuration. We can do that in our app delegate:
   func application(_ application: UIApplication,

                    configurationForConnecting connectingSceneSession: UISceneSession,

                    options: UIScene.ConnectionOptions) -> UISceneConfiguration {

     if options.userActivities.first?.activityType == \"com.stylemac.nerau.openResult\" {

       // Load our new window configuration

       return UISceneConfiguration(name: \"New Configuration\", sessionRole: connectingSceneSession.role)

     }

     // Load our default configuration

     return UISceneConfiguration(name: \"Default Configuration\", sessionRole: connectingSceneSession.role)

   }
By doing it this way, you can create multiple, different windows. Note that in beta 2, sometimes the user activities disappear on route with Catalysts. So if your options.userActivities is empty, then wait for another beta .. or look at Other Approaches below.
Other Approaches
Another, simpler approach to doing this is to just replace the rootViewController of the UIWindow in the SceneDelegate's
func scene(_ scene: UIScene, willConnectTo session: UISceneSession, options connectionOptions: UIScene.ConnectionOptions) {

   window?.rootViewController = MyCustomUIViewController()

}
Apple supports hovering in Catalyst via a new gesture recognizer, the so-called UIHoverGestureRecognizer. It works in a very simple manner.
- First you initialize a new hover gesture recognizer
- Then, you add it to your view
- Finally, you implement the method to be called when the user hovers
Now, for every mouse movement within the containment of the view, your method will be called and you can query the gesture recognizer for the position in order to implement custom logic (as Apple does in the Stocks.app when you hover over a Stock's price history).
Below is a simple implementation:
final class MyHoverViewController: UIViewController {

     override func viewDidLoad() {

         super.viewDidLoad()

         // Create the recognizer

         let hover = UIHoverGestureRecognizer(target: self, action: #selector(mouseDidMove(with:)))

         // Add it to the view

         view.addGestureRecognizer(hover)

     }


     @objc func mouseDidMove(with recognizer: UIHoverGestureRecognizer) {

         guard let view = recognizer.view else { return }

         // Calculate the location

         let locationInView = recognizer.location(in: view)

         print(\"Hovering at location \(locationInView)\")

     }

}
You can implement conditional code via the new targetEnvironment(UIKitForMac directive:
Compile code only on the macOS target
#if targetEnvironment(UIKitForMac)

   let toolbar = NSToolbar(identifier: \"MyToolbar\")

#endif
Compile code only on the iOS target
#if !targetEnvironment(UIKitForMac)

   import ARKit

#endif
Now, if you have more involved logic in your settings, special view controllers, web views, and other things, then this doesn't work well for you. In that case, you basically have three options.
- Don't display the preferences in a window, but present the view controller as a modal form or sheet instead
- Use the new iOS multi window support to, only on macOS, open the settings controller in a new window. This is a bit more involved but certainly the most feasible solution.
- Use AppKit to macOS specific preferences in a separate AppKit bundle and load it at runtime. We won't dive into this here, but you can find more information on this in Steve Troughton-Smith' excellent article on the topic.
Fortunately, each icon in the assets catalog (you're using assets catalogs, are you?) supports different varieties, including macOS. If you enable the "Mac" setting for any icon, additional slots will appear where you can add macOS specific icons to your asset. Catalyst will then automatically choose the right icons. This is what that looks like:
![]()
General Icons
You could just use your general iOS icons on the Mac, but keep the following things in mind:
- iOS icons are scaled down 77% on macOS / Catalyst. This can add artifacts
- Many Macs still have non-retina displays (i.e. the Macbook Air 13" is still non-retina and still being sold)
- If you don't have @1x variants of your icons, Catalyst will scale down the @2x variants, creating additional artifacts
- Icons might not look as good anymore in a scaled down manner. You might want to include separate macOS icons for some use cases
The App Icon
For a proper macOS app icon, the following sizes are needed:
- 16pt, 16pt @ 2x
- 32pt, 32pt @ 2x
- 128pt, 128pt @ 2x
- 256pt, 256pt @ 2x
- 512pt, 512pt @ 2x
That's 10 icons. However, if you don't care about the ability to add additional detail for retina variants, then you just need the following sizes - as some of those sizes overlap: 16, 32, 64, 128, 256, 512, 1024
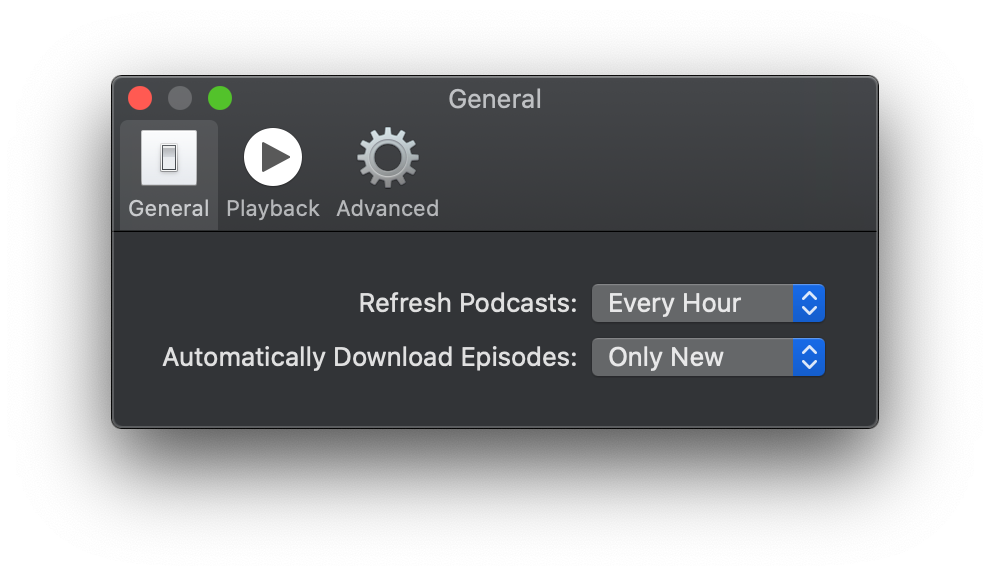
If you start one of Apple's prime Catalyst examples, the Podcast App, you will see this beautiful Preferences screen:
As you already know, Preferences in Catalyst apps are handled via the Settings.bundle technology. However, one feature that is very much missing from Apples documentation is how to implement the toolbars and toolbar icons at the top of the window (General, Playback, Advanced) via the Settings.bundle. In this guide, we will explain how it works.
How to implement the Preferences toolbar
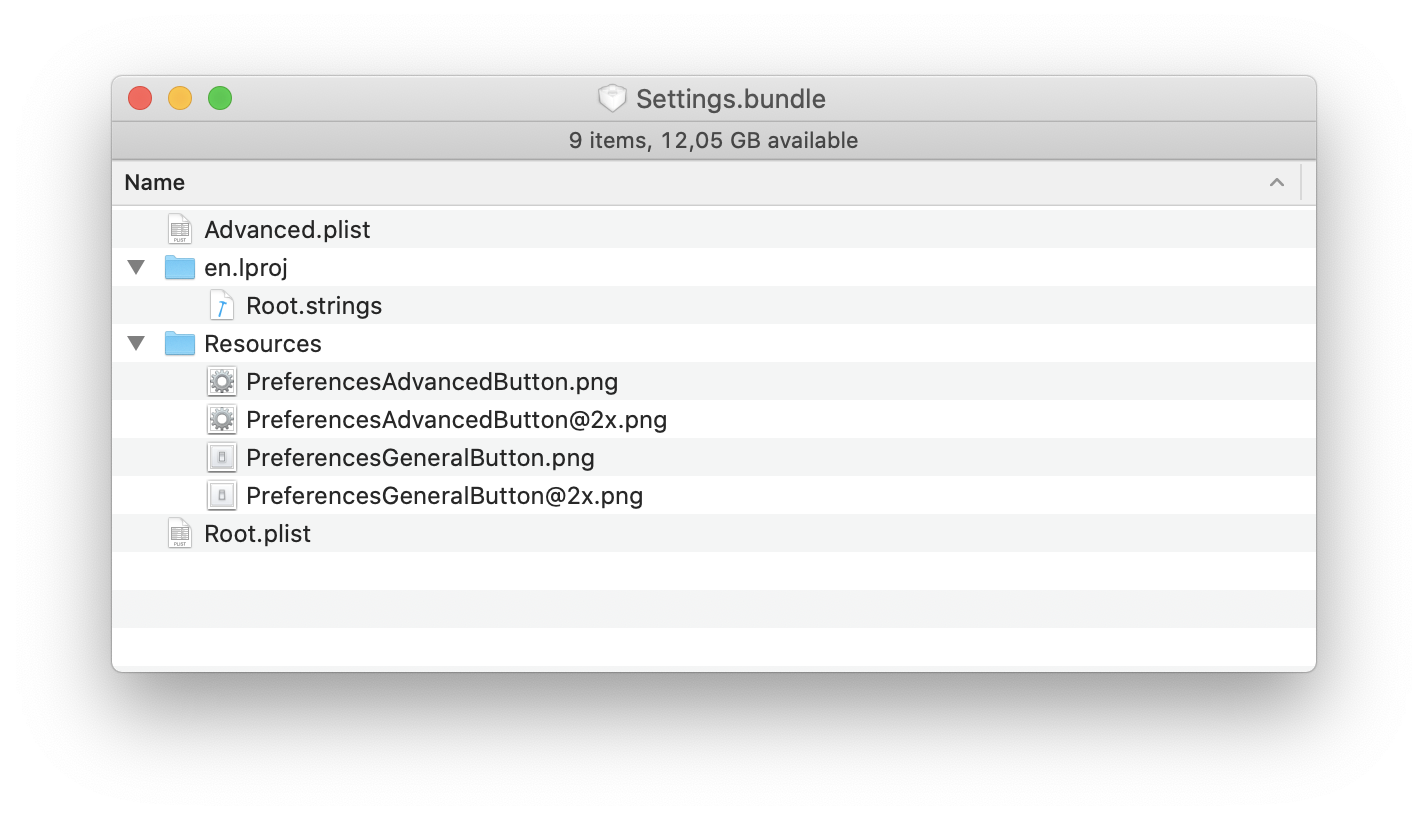
In addition to the regular settings bundle (with Root.plist), you need to add a couple of additional files first.
- A new
.plistfile for each section - Two new icons for each section, the
@1xand the@2xvariant
In our example, we will have two sections: General, and Advanced. So we need to .plist files, Root (for general) and Advanced for ... advanced. As well as corresponding images. It looks as follows:
Next, we need to explain to the system that it should display two Panes in the toolbar. We do that by adding an additional section to the Root.plist that lists all the Pane sections:
<key>PreferenceSpecifiers</key>
<array>
	...
	<dict>
		<key>Type</key>
		<string>PSChildPaneSpecifier</string>
		<key>Title</key>
		<string>Advanced</string>
		<key>File</key>
		<string>Advanced</string>
	</dict>
</array>
So here we're adding a new Settings Entry, if you will, to the Root plist that tells the system to add a new Child Pane into the toolbar with the title Advanced and from the file Advanced.plist.
If we wanted to add more panes, we would add more of those <dict> entries.
This is how we add multiple panes, but it still doesn't explain how to add our beloved icons to the pane. For that, we add a final additional entry at the bottom of each .plist. file (i.e. Root and Advanced) with a key and a string value:
In Root.plist
<key>Icon</key>
<string>PreferencesGeneralButton</string>
In Advanced.plist
<key>Icon</key>
<string>PreferencesAdvancedButton</string>
This is sufficient to give us a nice Preferences screen:
The final PLIST files
Here're the full .plist files for you.
Root
<?xml version="1.0" encoding="UTF-8"?>
<!DOCTYPE plist PUBLIC "-//Apple//DTD PLIST 1.0//EN" "http://www.apple.com/DTDs/PropertyList-1.0.dtd">
<plist version="1.0">
<dict>
	<key>StringsTable</key>
	<string>Root</string>
	<key>PreferenceSpecifiers</key>
	<array>
		<dict>
			<key>Type</key>
			<string>PSToggleSwitchSpecifier</string>
			<key>Title</key>
			<string>Enabled</string>
			<key>Key</key>
			<string>enabled_another_preference</string>
			<key>DefaultValue</key>
			<true/>
		</dict>
		<dict>
			<key>Type</key>
			<string>PSChildPaneSpecifier</string>
			<key>Title</key>
			<string>Advanced</string>
			<key>File</key>
			<string>Advanced</string>
		</dict>
	</array>
	<key>Icon</key>
        <string>PreferencesGeneralButton</string>
</dict>
</plist>
Advanced
<?xml version="1.0" encoding="UTF-8"?>
<!DOCTYPE plist PUBLIC "-//Apple//DTD PLIST 1.0//EN" "http://www.apple.com/DTDs/PropertyList-1.0.dtd">
<plist version="1.0">
<dict>
	<key>StringsTable</key>
	<string>Root</string>
	<key>PreferenceSpecifiers</key>
	<array>
		<dict>
			<key>Type</key>
			<string>PSToggleSwitchSpecifier</string>
			<key>Title</key>
			<string>Enable Export</string>
			<key>Key</key>
			<string>enabled_preference</string>
			<key>DefaultValue</key>
			<true/>
		</dict>
	</array>
	<key>Icon</key>
	<string>PreferencesAdvancedButton</string>
</dict>
</plist>
That should be it.
Many of the iOS specific targets, such as iMessage extensions or Share Extensions are currently not supported on UIKitForMac.
Catalyst, just like Cocoa, uses the responder chain to figure out whether an action in a menu can be performed. Remember, that a menu bar on iOS is composed out of UIAction, UICommand, and UIMenu objects.
The way that works is as follows:
- When you open a menu in the menu bar with your mouse
- UIKit will have a look at the first responder and call
canPerformAction(_:withSender:)to figure out if the first responder has a matching@IBAction someMethodthat fits the selector from the menubar item in question- If the first responder returns no, it will ask the next responder
- If a responder returns yes, then this menu bar entry will be enabled (clickable) and this responder (i.e. object or view controller) will be set as the current
targetof the menu bar entry. - If the next responder is nil - that is, it UIKit reached the end of the responder chain - it will stop and the menu bar entry will be disabled.
This process happens for each item in the menubar.
If you want to influence how a menu bar item becomes enabled / disabled based on the particulars of your view controller, you can override canPerformAction and write custom logic. Here is a quick example. Here, we imagine that a menubar action should only be enabled if we have actual text in our textField.
override func canPerformAction(_ action: Selector, withSender sender: Any?) -> Bool {

   guard !(textField.text ?? \"\").isEmpty else { return false }

   return super.canPerformAction(action, withSender: sender)

}
Currently, there doesn't seem to be a way to do this. I've tracked this as issue FB6360289 in Apple's Feedback tool.
I could not figure out how to dynamically update the enabled / disabled status of toolbar items based on app actions such as a new controller entering the responder chain. This makes it very difficult to implement toolbars that adapt to the users actions. Event Apple’s own Catalyst apps seem to be affected by this: The Stocks app has a “Share” toolbar item that just does nothing when pressed and nothing is selected (it is enabled, not disabled).
The best solution is to have a singleton with access to the toolbar (or as a dependency injection) and then call a method on it that updates the contents of the toolbar. An easy way to do that is by iterating over the toolbar.items property and updating each entry accordingly (disabling / enabling).
This is similar to how you would dynamically modify the contents of your touchbar: Update the touchbar and set it again.
The responder chain is a event handling system at the heart of macOS and iOS.
Every touch event coming in, for example, uses this responder chain to reach the currently active UIControl. The main building block of the responder chain is the UIResponder class which is a superclass of UIViewController or UIView.
Apple has very useful information on this available:
Below, I'll quote the most important sections to understand the thing:
Responders receive the raw event data and must either handle the event or forward it to another responder object. When your app receives an event, UIKit automatically directs that event to the most appropriate responder object, known as the first responder.
Unhandled events are passed from responder to responder in the active responder chain.
Here's an image from the Apple Documentation:
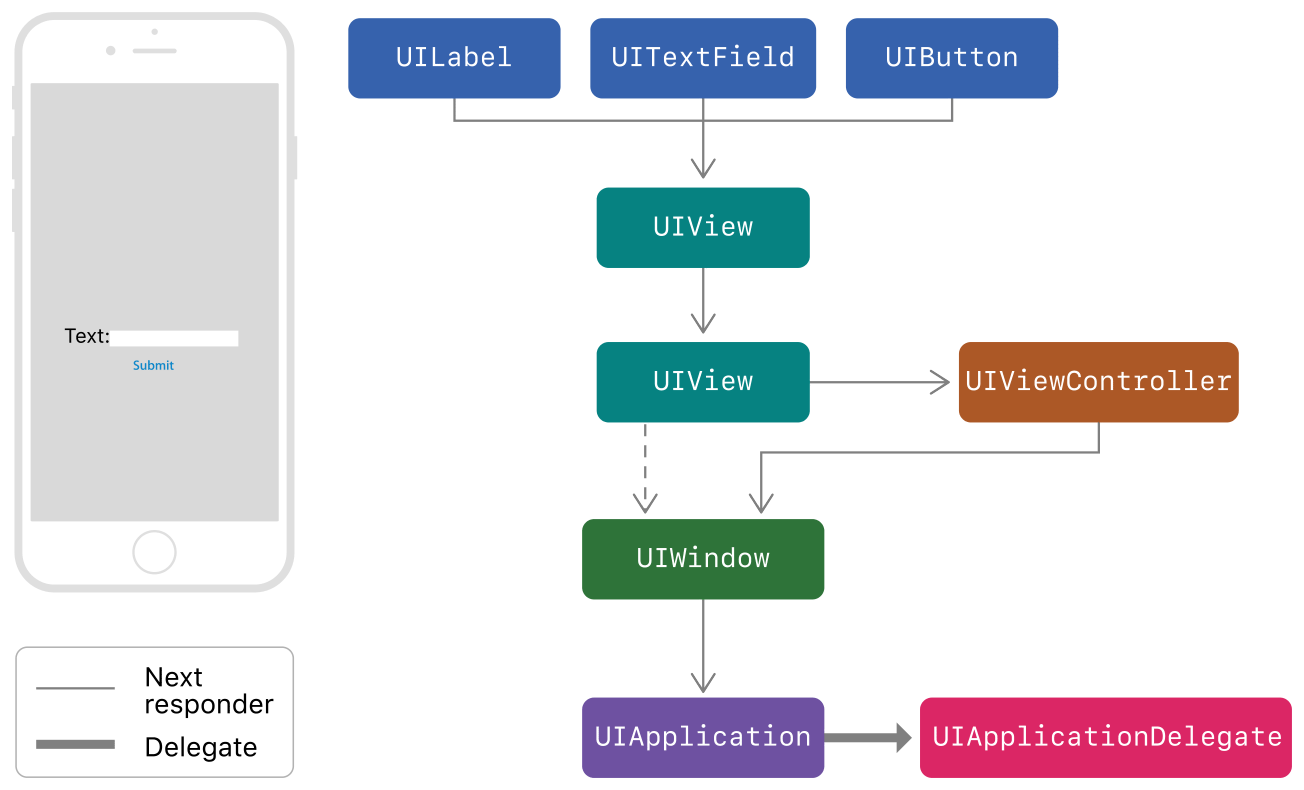
Now imagine that you're entering text in the text field. The following will happen:
- If the text field does not handle an event, UIKit sends the event to the text field’s parent UIView object
- If that does not handle the event, it is forwarded to the next UIView.
- If that does not handle the event, it is forwarded to the UIViewController (which is the root view controller of the window)
- If the view controller is not handling the event, it is forwarded to the
UIApplication - If the UIApplication is not handling the event, it is handled by the
UIApplicationDelegate
This also means that if you really need to catch a certain event, you can always set up the required selector / method in your app delegate.
Altering the Responder Chain
You can alter the responder chain by overriding the next property of your responder objects. When you do this, the next responder is the object that you return.
This more or less only affects paid apps
On iOS, Apple automatically deploys code that does receipt validation and makes sure that your app can't just be pirated by copying it from device to device (albeit this still being a possibilty on rooted iOS devices).
On macOS, users can just copy the MyApp.app folder to a different Mac and run it. By default, macOS does not perform any receipt validation whatsoever. Apple has some guides on how to implement the necessary code to perform receipt validation yourself..
Please Don't do that!
This is rather difficult to do properly, and even then you have to do it in a way that can't be easily circumvented by hackers. This is certainly doable but requires an astonishing amount of work. There's a much better solution.
Receigen
Receigen is a fantastic macOS app that will automatically generate the required receipt validation code for you. I strongly suggest using Receigen or an alternative solution.
This is a list of somehow known issues, i.e. bugs where enough people seem to have them that it seems it is not an issue in your app but instead related to the current beta. This list is helpful to keep you from trying to hunt down a bug that's not yours.
My app crashes when I close a window
If you see this when closing a window:
That seems to be an issue in the current beta
My app crashes with "another instance of this process was already running"
This seems to be a bug or a feature in Catalina. With AppKit apps, multiple instances of the same app (with the same bundle identifier) can be running without an issue. If you duplicate Calculator.app 5 times and start them all, you have 5 calculators running. This seems to not be the case with Catalyst apps. If a Catalyst apps crashes in a certain way, apparently the system thinks it is still running. Thus, you can't run it again. Currently the only solution I know of is to reboot Catalina. Congratulations. The full error is:
I get weird SwiftUIKit compiler errors
Could it be that your Xcode-beta.app is either not in /Applications or not named Xcode-beta.app? (I.e. Xcode-Beta v11.app. Then, Catalyst apps currently won't compile.
When I create a new Window, the NSUserActivity disappears
This seems to be rather flaky currently.
| Similar Articles |
|---|
