Data in Swift 3 parsing a Doom WAD File
Swift 3 replaces NSData with the Data value type. Implement a Doom Wad file parser with the new Data type to understand the differences.
From NSData to Data in Swift 3
Swift 3 encompasses many different small and big changes to the
language. One of them is the introduction of value type wrappers for
common Foundation reference types such as NSData (Data) or NSDate
(Date). These new types differ not only in their memory behaviour and
name, their methods also differ from their reference-based
counterparts1. From small changes to new method names up to big
changes like completely removed functionalities, these new value types
require some getting used to. This post will try to highlight some of
the bigger changes happened to Data the value-based wrapper for
NSData.
Even better, after going through the basics, we will write a small example application that will read and parse a Doom 2 WAD file.

Basic Differences
One of the most common usage scenarios for NSData is the loading and
writing of data via these calls:
func writeToURL(_ url: NSURL, atomically atomically: Bool) -> Bool

func writeToURL(_ url: NSURL, options writeOptionsMask: NSDataWritingOptions) throws

// ... (implementations for file: String instead of NSURL)

init?(contentsOfURL url: NSURL)

init(contentsOfURL url: NSURL, options readOptionsMask: NSDataReadingOptions) throws

// ... (implementations for file: String instead of NSURL)
For those basic usages, very little changed. The new Data type offers
these methods:
init(contentsOf: URL, options: ReadingOptions)

func write(to: URL, options: WritingOptions)
Note that Data simplifies the various ways of reading and writing data
from the file system into two calls while NSData offers multiple
different methods.
Another difference can be observed when comparing the methods on
NSData with those on Data. While NSData offers 30 methods &
properties, Data offers 130. This huge difference is easily explained
via Swift's formidable Protocol Extensions. Data obtains many of
those methods from the following protocols:
- CustomStringConvertible
- Equatable
- Hashable
- MutableCollection
- RandomAccessCollection
- RangeReplaceableCollection
- ReferenceConvertible
This adds functionality to Data which did not exist in NSData.
Here's a small sample:
func distance(from: Int, to: Int)

func dropFirst(Int)

func dropLast(Int)

func filter((UInt8) -> Bool)

func flatMap<ElementOfResult>((UInt8) -> ElementOfResult?)

func forEach((UInt8) -> Void)

func index(Int, offsetBy: Int, limitedBy: Int)

func map<T>((UInt8) -> T)

func max()

func min()

func partition()

func prefix(Int)

func reversed()

func sort()

func sorted()

func split(separator: UInt8, maxSplits: Int, omittingEmptySubsequences: Bool)

func reduce<Result>(Result, (partialResult: Result, UInt8) -> Result)
As you can see, many functional approaches, such as mapping or filtering
can now be done on the byte contents of Data types. This, to me, is a
huge improvement over NSData. An example of the benefits this brings
is how easily you can now subscript and compare data:
var data = Data(bytes: [0x00, 0x01, 0x02, 0x03])

print(data[2]) // 2

data[2] = 0x09

print (data == Data(bytes: [0x00, 0x01, 0x09, 0x03])) // true
Data also offers several new initializers which specifically handle
other common Swift data types:
init(bytes: Array<UInt8>)

init<SourceType>(buffer: UnsafeMutableBufferPointer<SourceType>)

init(repeating: UInt8, count: Int)
GetBytes
Another difference which you will run into if you're using Data to
interact with lower level code such as C libraries is the distinct
lack of the NSData getBytes method:
// NSData

func getBytes(_ buffer: UnsafeMutablePointer<Void>, length length: Int)
There're many different usage scenarious for getBytes. One of the
most common is when you need to parse a file and read the bytes into
data types / variables. A common example: Say you want to read a binary
file which encodes a list of items. The file is encoded as follows:
Datatype Size Function
Char 4 Header (ABCD) UInt32 4 Start of Data UInt32 4 Amount of items
The file contains a 4 byte string "ABCD" tagging it as the correct file type. The next 4 bytes define the start of the actual data (i.e. where the header ends and the items begin), the final 4 bytes in the header define the amount of items stored in this file.
Parsing this data with NSData is pretty straight forward:
let data = ...

var length: UInt32 = 0

var start: UInt32 = 0

data.getBytes(&start, range: NSRange(location: 4, length: 4))

data.getBytes(&length, range: NSRange(location: 8, length: 4))
This will return the correct result3. If your data does not contain C
strings, there's an even easier way of doing this, you can simply
define a struct with the correct fields and read the bytes directly
into the struct:
Datatype Size Function
UInt32 4 Start of Data UInt32 4 Amount of items
let data = ...

struct Header {

   let start: UInt32

   let length: UInt32

}

var header = Header(start: 0, length: 0)

data.getBytes(&header, range: NSRange(location: 0, length: 8))
Data alternatives to getBytes
However, if you're using Data this functionality is not available
anymore. Instead, Data offers a new method:
// Access the bytes in the data.

func withUnsafeBytes<ResultType, ContentType>((UnsafePointer<ContentType>) -> ResultType)
This method allows direct access of the our data's bytes from within a closure. Let's see a simple example:
let data = Data(bytes: [0x01, 0x02, 0x03])

data.withUnsafeBytes { (pointer: UnsafePointer<UInt8>) -> Void in

     print(pointer)

     print(pointer.pointee)

}

// Prints:

// : 0x00007f8dcb77cc50

// : 1
Ok, now that we have an unsafe UInt8 pointer into our data, how does this help us? First of fall, we obviously need a different data type, and we're sure (we have to be!) that the data is indeed of this particular data type. We know that this data contains a Int32 type, so how do we decode it correctly?
As we already have a unsafe pointer (of type UInt8) it is easy to move
this into an unsafe pointer of our target type. UnsafePointer has a
pointee property which returns the type that the pointer is pointing
to as the correct type:
let data = Data(bytes: [0x00, 0x01, 0x00, 0x00])

let result = data.withUnsafeBytes { (pointer: UnsafePointer<Int32>) -> Int32 in

       return pointer.pointee

}

print(result)

//: 256
As you can see, we created a byte Data instance, and returned the data
as Int32 by defining an UnsafePointer<Int32> in the closure. You can
shorten this code if the compiler is able to infer the result type from
the context:
let result: Int32 = data.withUnsafeBytes { $0.pointee }
Lifetime of the data
One important consideration of using withUnsafeBytes (apart from the
fact that the whole operation is unsafe) is that the lifetime of the
pointer you're accessing is limited to the lifetime of your closure. As
the documentation notes:
Warning The byte pointer argument should not be stored and used outside of the lifetime of the call to the closure.
Generic Solution
Now that we have a way of accessing raw bytes and casting them to the
correct type, we ought to create a generic solution that allows us to
perform this operation easily without the syntactical overhead. Also, we
still did not account for the fact that we need to perform the operation
on a subsequence of our data and not the whole Data instance. A
generic solution would look like this:
extension Data {

     func scanValue<T>(start: Int, length: Int) -> T {

         return self.subdata(in: start..<start+length).withUnsafeBytes { $0.pointee }

     }

}

let data = Data(bytes: [0x01, 0x02, 0x01, 0x02])

let a: Int16 = data.scanValue(start: 0, length: 1)

print(a)

// : 1
Compared to our earlier code, this has a couple of notable differences:
- We're using
subdatato only scan the bytes of a specific slice of our Data. - We're using generics to support different possible data types for extraction
To Data
The opposite case, taking an existing variable and getting a Data
buffer to the content, is not relevant for the Doom example below, but
easy enough to implement:
var variable = 256

let data = Data(buffer: UnsafeBufferPointer(start: &variable, count: 1))

print(data) // : <00010000 00000000>
Parsing the Doom WAD file
I've played a lot of Doom in my youth. I loved the game. I also created a lot of Doom levels and modified the WAD file to incorporate new sprites, textures, and more. So when I thought about a nice (and simple) example of how to parse a binary file, I remembered the layout of the WAD file which is pretty straightforward and easy to implement. So I wrote a simple app that reads a WAD file and lists the names of all the floor textures stored in the WAD4.
The source code for this application is available on Github.
The Doom WAD file layout is described in these two documents:
However, for our simple example, we only need to understand a subset of the format. First, each WAD file begins with a header:
Datatype Size Function
Char 4 IWAD or PWAD string Int32 4 The number of lumps in the WAD Int32 4 Pointer to the location of the directory
The first 4 bytes are spend to identify the file format. IWAD are
official Doom WAD files, PWAD are patches containing additional
information patched at runtime into the main WAD file. Our application
will only read IWAD files. The next 4 bytes define the number of
lumps in the WAD. Lumps are the individual items that the Doom engine
operates with: Textures, Sprite-Frames, Text blocks, Models, etc. Each
texture is a distinct lump. The final 4 bytes define the location of the
directory. We'll explain the directory below, once we start parsing
it. First, lets parse the header.
Parsing the Header
Reading a WAD file is straight forward:
let data = try Data(contentsOf: wadFileURL, options: .alwaysMapped)
Once we have the data, we need to parse the header. We're making heavy
use of the scanValue Data extension we defined earlier.
public func validateWadFile() throws {

     // Several Wad File definitions

     let wadMaxSize = 12, wadLumpsStart = 4, wadDirectoryStart = 8, wadDefSize = 4

     // A WAD file always starts with a 12-byte header.

     guard data.count >= wadMaxSize else { throw WadReaderError.invalidWadFile(reason: \"File is too small\") }


     // It contains three values:


     // The ASCII characters \"IWAD\" or \"PWAD\". Defines whether the WAD is an IWAD or a PWAD.

     let validStart = \"IWAD\".data(using: String.Encoding.ascii)!

     guard data.subdata(in: 0..<wadDefSize) == validStart else

     { throw WadReaderError.invalidWadFile(reason: \"Not an IWAD\") }


     // An integer specifying the number of lumps in the WAD.

     let lumpsInteger: Int32 = data.scanValue(start: wadLumpsStart, length: wadDefSize)


     // An integer holding a pointer to the location of the directory.

     let directoryInteger: Int32 = data.scanValue(start: wadDirectoryStart, length: wadDefSize)


     guard lumpsInteger > 0 && directoryInteger > Int32(wadMaxSize)

         else {

             throw WadReaderError.invalidWadFile(reason: \"Empty Wad File\")

     }

}
You can find additional types (such as the WadReaderError enum) in
the source on GitHub. The
next step is to parse the directory, so that we get the addresses and
sizes of the individual lumps.
Parsing the Directory
The directory associates names of lumps with the data that belong to them. It consists of a number of entries, each with a length of 16 bytes. The length of the directory is determined by the number given in the WAD header.
Each of the 16 bytes entries follows the same format:
Datatype Size Function
Int32 4 The start of the lumps data in the file Int32 4 The size of the lump in bytes Char 8 An ASCII string defining the lump's name
The name char is a bit more complicated. The documentation says:
An ASCII string defining the lump's name. Only the characters A-Z (uppercase), 0-9, and [ ] - _ should be used in lump names (an exception has to be made for some of the Arch-Vile sprites, which use "\"). When a string is less than 8 bytes long, it should be null-padded to the tight byte.
Note the last sentence. In C, a String is terminated with the null
character (\0). This signifies to the system that the memory for the
string ends here. Doom saves space by having an optional null character.
When the string is less than 8 bytes long, it will contain a null
character, when it is of the max length (8 bytes) the 8th byte will be
the final character, not the null character.
0 1 2 3 4 5 6 7
Short I M P \0 \0 \0 \0 \0 #
Long F L O O R 4 _ 5 #
See above for an example. The Short name has a null character after the
last letter in position 3, the long name does not have a null character,
instead the last letter is the 5 from the name FLOOR4~5~. The
# signifies the beginning of the next item / piece of memory.
Before we venture into supporting this, lets first take care of the easier part, reading the start and size.
Before we start, we should define a data structure that can store the information from the directory:
public struct Lump {

     public let filepos: Int32

     public let size: Int32

     public let name: String

}
Afterwards, we take the slice of data that constitutes our directory from the complete data instance.
// Define the default size of a directory entry

let wadDirectoryEntrySize = 16

// Extract the directory slice from the main Data

let directory = data.subdata(in: Int(directoryLocation)..<(Int(directoryLocation) + Int(numberOfLumps) * wadDirectoryEntrySize))
Next, we can iterate over the Data in 16byte steps. This works great
with Swift's stride function:
for currentIndex in stride(from: 0, to: directory.count, by: wadDirectoryEntrySize) {

     let currentDirectoryEntry = directory.subdata(in: currentIndex..<currentIndex+wadDirectoryEntrySize)


     // An integer holding a pointer to the start of the lump's data in the file.

     let lumpStart: Int32 = currentDirectoryEntry.scanValue(start: 0, length: 4)


     // An integer representing the size of the lump in bytes.

     let lumpSize: Int32 = currentDirectoryEntry.scanValue(start: 4, length: 4)

     ...

}
This was the easier part the next part is a bit more difficult.
Parsing C Strings
Remember, for each lump's name, we need to stop reading bytes into our Swift string once we reach a null terminator or once we reach 8 bytes. The very first thing to do is create a data slice with the relevant data:
let nameData = currentDirectoryEntry.subdata(in: 8..<16)
Swift offers great support for C String interoperability. This means
that to create a string we just need to hand the data to a String
initializer:
let lumpName = String(data: nameData, encoding: String.Encoding.ascii)
This works, though the result is not correct. This method ignores the
null terminator, so that all names, even the short ones, are converted
to 8byte strings. As an example, the lump for the IMP character name
becomes IMP00000. This happens because Doom fills the remaining 5
bytes with null characters and String(data:encoding:) does not
interpret them but creates a string of the full 8 bytes of the
nameData.
If we want to support null characters, Swift offers something else, a
cString initializer which is defined for reading valid cStrings with
null terminators:
// Produces a string containing the bytes in a given C array,

// interpreted according to a given encoding.

init?(cString: UnsafePointer<CChar>, encoding enc: String.Encoding)
Note that it doesn't require a data instance as its parameter but an
unsafePointer to CChars instead. We already know how to do that, so
lets write the code:
let lumpName2 = nameData.withUnsafeBytes({ (pointer: UnsafePointer<UInt8>) -> String? in

     return String(cString: UnsafePointer<CChar>(pointer), encoding: String.Encoding.ascii)

})
This, again, doesn't work. In all cases where Doom's names are less than 8 characters, this code works flawlessly, but once we reach a 8 byte name without a null terminator, it will continue reading (into the next 16byte segment) until it finds the next valid null terminator. This results in long strings with random memory at the end.
Since this logic is custom to Doom, we also need to implement custom
code. As Data supports Swift's collection & sequence operations, we
can just solve this in terms of reduce:
let lumpName3Bytes = try nameData.reduce([UInt8](), { (a: [UInt8], b: UInt8) throws -> [UInt8] in

     guard b > 0 else { return a }

     guard a.count <= 8 else { return a }

     return a + [b]

})

guard let lumpName3 = String(bytes: lumpName3Bytes, encoding: String.Encoding.ascii)

     else {

         throw WadReaderError.invalidLup(reason: \"Could not decode lump name for bytes \(lumpName3Bytes)\")

}
This code just reduces over the UInt8 bytes of our data and checks
whether we have an early null terminator. This code works, though it is
not necessarily fast as the data has to be moved through several
abstractions.
It would be better if we could solve this similarly to how the Doom
engine does it. Doom just moves the pointer of the char* and checks
for each char whether it is a null terminator in order to break early.
As Doom is written in low level C code, it can just iterate over the raw
pointer addresses.
How would we implement this logic in Swift? We can actually do something
quite similar in Swift by, again, utilizing withUnsafeBytes. Lets see:
let finalLumpName = nameData.withUnsafeBytes({ (pointer: UnsafePointer<CChar>) -> String? in

     var localPointer = pointer

     for _ in 0..<8 {

         guard localPointer.pointee != CChar(0) else { break }

         localPointer = localPointer.successor()

     }

     let position = pointer.distance(to: localPointer)

     return String(data: nameData.subdata(in: 0..<position),

                   encoding: String.Encoding.ascii)

})

guard let lumpName4 = finalLumpName else {

     throw WadReaderError.invalidLup(reason: \"Could not decode lump name for bytes \(lumpName3Bytes)\")

}
Similar to our earlier uses of withUnsafeBytes we're receiving a
pointer to the raw memory. pointer is a let constant, but we need to
modify the variable, which is why we create a local mutable version in
the first line 5.
Afterwards, we're performing the main work. We loop from 0 to 8 and for
each loop iteration we test whether the char that the pointer is
pointing to (the pointee) is equal to the null terminator
(CChar(0)). If it is equal to the null terminator, this means that we
found the null terminator early, and we break. If it is not equal to the
null terminator, we overwrite localPointer with its successor, i.e.
the next position in memory after the current pointer. That way, we're
iterating byte by byte over the contents of our memory.
Once we're done, we calculate the distance between our original
pointer and our localPointer. If we just advanced three times before
finding a null terminator, the distance between the two pointers would
be 3. This distance, finally, allows us to create a new String instance
with the subdata of actual C String.
This allows us to create a new Lump struct with the required data:
lumps.append(Lump(filepos: lumpStart, size: lumpSize, name: lumpName4))
When you look into the source, you will see ominous references to
F_START and F_END. Doom marks the beginning and end of special lump
regions with empty lumps with magic names. F_START / F_END enclose
all the floor texture lumps. We will ignore this additional step in this
tutorial.
A screenshot from the final application:
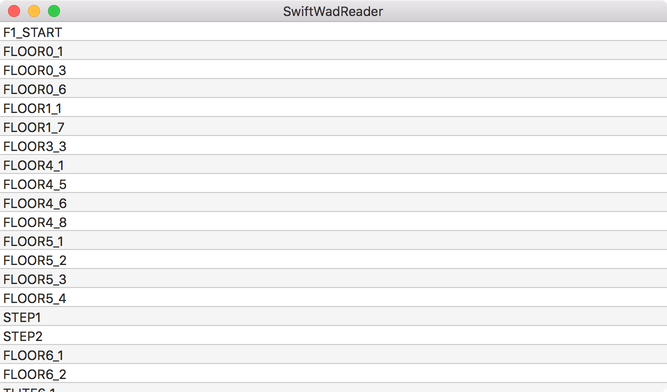
Not really impressive, I know. One of the next installments on this blog might concentrate on how to display those textures.
Bridging to NSData
I find the new Data easier to work with than NSData. Nevertheless,
if you need NSData or if you need to use the getBytes method,
there's an easy way to convert Data to NSData. The Swift
documentation writes:
This type provides "copy-on-write" behavior, and is also bridged to the Objective-C NSData class. You can wrap an instance of a custom subclass of NSData in struct Data by converting it using myData as Data.
// Create a new Data Struct

let aDataStruct = Data()

// Get the underlying reference type NSData

let aDataReference = aDataStruct as NSData
Whenever you feel that what you're trying to do seems to be really hard
with the Data type, it is easy to go back to NSData to use the well
known tried and trusted methods. However, in general you should strive
to use the new Data type whenever possible (except if you need
reference semantics):
Some, such as Date aren't even wrappers but completely new
implementations
Doom1, Doom2, Hexen, Heretic, or Ultimate Doom. Though I've only tested it with Doom1 Shareware
Note we did not make sure that this is indeed an ABCD file by testing for the first 4 bytes, but that would be easy to add
I kinda wanted to also display the textures but lacked the time to implement that.
Swift 3 dropped support for the useful var annotation in closure
or function bodies