SwiftUI Introduction
SwiftUI is a generational milestone for the Apple development ecosystem. This is a in-development introduction into the topic.
Preface
When Apple released Swift in 2014 it was a tectonic shift for the Apple development community. One that few people had anticipated. Though while Swift was a much different language than Objective-C, the methods and function you'd call, the frameworks, kept unchanged. In fact, you could ignore the enums and associated types and write Swift that looked and felt much like Objective-C, utilising Foundation and UIKit just as before. This was important for Apple because the scope of UIKit and Foundation is much bigger than that of Swift.
With SwiftUI, all of this changes. While a Objective-C developer from the 80s would feel right at home with 2017 era Swift code employing target action or delegate mechanisms, a SwiftUI project would look much more alien to him. Apple moved past its development history (shared with NeXT) of the past ~30 years in a generational leap that will hopefully be the base for decades to come. In doing so, Apple also moved the goalpost of mobile application development:
- A shared framework for all Apple platforms (iOS, macOS, watchOS, etc)
- Declarative with live reload and live preview
- Type-Safe UI declarations
- Going beyond Interface Builder
- High level abstraction that will allow future compile time optimizations
- Fully compatible with UIKit / AppKit
- Automatic support for dark mode, dynamic text, and more
- Smart dependency injection via environments
- Combine framework for well thought-out bindings
- much more
However, don't throw away your old code just yet. While SwiftUI is very exciting (as all Shiny New Things tend to be), it is also a very early beta. Apple already shipped some watchOS apps with SwiftUI (Calculator is an example) but at the same time a calculator on the watch is a different beast than a 200k LOC iPhone app. Some important components will come in a later beta, some components might only come next year, the documentation is still very, very sparse, live preview requires the beta of macOS Catalina.
In general, it seems that much of the flexibility that UIKit offered has been replaced with a more high level and less customizable interface. You can always resort to UIKit though. This is also a very important point to stress.
Just as Swift changed a lot after its introduction, I also expected SwiftUI to change in the coming years. This guide introduces SwiftUI in a general manner by developing a small app. It also lists various tips and tricks for things that are difficult or non-intuitive to do in SwiftUI. Lets begin!
Declarative.. what? Reactive.. what?
When SwiftUI came out some developers were quick to draw parallels to other existing app development technologies such as RxSwift, React, Flutter, Elm, and others. Indeed, some of the key ideas of SwiftUI are similar to what these other technologies offer. However, even if you've never used one of them, don't be afraid. While the general ideas are the same, the implementations vary wildly. You'd also not claim to be a .NET developer just because Windows Forms and UIKit are object oriented UI frameworks. In a similar manner the details matter and that is, really, where we all start as beginners again.
Below, you will find a quick introduction into declarative and reactive programming. If you think you already know this, just move on to the next part where we build a shoe composer in SwiftUI.
The beauty of a game engine
One point that was reiterated during 2019 WWDC as well as numerous conference talks, blog posts and tweets before that is that state is a very fickle thing. Many bugs manifest because we have a variable that is shared between places and one of the places updates it while the other doesn't register this update, and suddenly we have different state in two places and confusing things happen. Imagine a search field that doesn't update the result list when the user replaces the next with a paste command. The problem is not that we forgot to also remember to update the list on paste, the problem is that the state of the search field contents exists in two places: In the search field and in the result list as a predicate. The correct solution would be to have the state only in one place and both the list and the search field connect to this value. As the value changes, both the text field and the list redraw.
Most 3D game engines work this way. While the fundamentals of a game engine are incredibly complicated, the basics are stunningly simple. A game engine works as follows:
- Have a internal state of what the world looks like (which player is where, which enemies are where)
- Draw the whole world
- while True
- Take user input, calculate enemy movement
- Update the internal state
- Draw the whole world
Can you pin-point what is so fundamentally simple about this? There are no UIViews or UIButtons or UITableViews that need to be updated once the user enters something. Everything is being re-rendered all the time. Each change to the internal state (the user moved) results in a complete re-render of the whole scene. There're no hidden views, forgotten UIViewController children, data sources, UI updates, and so on. The whole scene, really, is just a long list of draw calls based on the current state.
Being lazy
Doing this with a traditional UI framework like UIKit would be rather cumbersome. Not only would the CPU be busy allocating and deallocating a lot of views all the time, all the user actions would also result in heavy flickering and jittery movements. That's because all of UIKit is build on the model that views are not recreated 60 times a second. However, our UI apps don't actually change like a game scene. Instead, only some elements change. In a game, each movement usually moves all the vertices of the scene around. In our apps, most of the time, just one element changes its state. Thus we can add an optimization to make this game engine approach much more feasible for our us: We only re-render what actually changed. If the user taps a button, this button needs to be re-rendered, everything else can be kept as is. This is one of the magic ingredients of SwiftUI.
A game engine that does UI
SwiftUI does everything explained above. It forces you to share state with bindings among multiple views. If state changes, the views are compared to see if the new state would change their output. If that's the case they're re-rendered. If not, they're kept as is. With this approach, SwiftUI is like a game engine for UI apps. Instead of thinking how you would add and remove buttons, you just re-render your whole UI based on the current state. SwiftUI makes sure that only the relevant parts are actually updated. This is best explained with a simple example.
A simple example
Imagine you have an app with a toggle button and a search field. The toggle button controls the visibility of the search field. Here is our UIKit implementation:
final class ButtonView: UIViewController {

     var toggleButton = UISwitch()

     var searchField = UISearchTextField()


     override func viewDidAppear(_ animated: Bool) {

         super.viewDidAppear(animated)

         toggleButton.addTarget(self, action: #selector(didTapButton(sender:)), for: .allTouchEvents)

         searchField.isHidden = true

         view.addSubview(toggleButton)

         view.addSubview(searchField)

     }


     @objc func didTapButton(sender: UISwitch) {

         searchField.isHidden = !toggleButton.isOn

     }

}
This is classic iOS code and while there are many things that can be improved here, it shows a standard pattern. In contrast to the game engine example we had earlier, this view is not re-rendered for every user action. In fact, this view has state in multiple places: searchField.isHidden and toggleButton.isOn. We assign them in didTapButton, but this is not a clear binding that UIKit knows about. If we just change toggleButton.isOn = true somewhere else, the searchfield will not change. Lets look at a (simplified) SwiftUI alternative:
struct ButtonView : View {

     @State var visible: Bool = false

     var body : some View {

         VStack {

             Toggle(isOn: $visible) {

                 Text(\"Toggle\")

             }

             if visible {

                 Text(\"Hello World\")

             }

         }

     }

}
So what is happening here? First of all, we're missing a lot of ceremony around the initialization and creation of UI elements. Where is our toggle initialized, and where is our text initialized? Also, where are we setting the value from the toggle on the hidden property of the text? Also, what's with the weird some View, @State, VStack, and $visible. We will explain one after the other.
First of all, remember what we said earlier. SwiftUI is like a lazy game engine. Whenever something changes, the UI is rerendered. Since our UI is always rerendered, we don't have to care about state, about the allocation and creation and initialization of buttons. Instead, we just describe to Swift what the UI should look like (akin to the draw calls in a game engine). That's what's happening here. Our var body : some View is a property that returns the complete description of our current UI. The UI is composed out of UI components. In our example this is VStack, Toggle, and Text.
VStack: This is a vertical stack. It aligns its children in a vertical list.Toggle: Is our toggle button. However, compared to UIKit the toggle button requires a value that stores the current toggle value. It doesn't store it itself. There is no internal toggle state. Instead, the toggle requires you to tell it where to store its state. We do this with the$NameOfVariable. The syntax for this might look a bit alien, but we will ignore this for now for the sake of simplicity.Text: This will construct a newlabel. Easy.if visible: This also looks kinda obvious. If the variablevisibleis set totruethen, please render the text field. But.. how does this update? Initially,visibleis set to false, so how does theTextbecome visible again? Remember, just like a game engine, whenever the state changes, we re-render the UI. So that means that whenevervisiblechanges its value, theif visibleis executed again.
But how does Swift figure out that var visible has changed? We did not set a didSet or set {} get {} for this property, neither did we use @managed, @objc or @dynamic. Instead there is a new thing! @State. This is what tells Swift that visible should be a special variable that we can bind components to. Components such as our Toggle button. @State is used for component / view local state. The way it works is as follows:
@State var visible: Boolwill create a new variable with a lot of update and subscription machinery in the background.Toggle(isOn: $visible)will bind to thisvisisblevalue. Whenevervisiblechanges, our toggle will change. Changing our toggle will always also changevisible. These two are linked.- Since we're referring to our
visiblevariable from within ourbody(viaif visible) Swift knows that ourbodyis dependent uponvisible. This means that whenevervisiblechanges, Swift will be like "Oh, visible changed, this means the view is probably out of date, I will re-render the view".
So, our if visible { Text(...) } will be re-executed whenever our toggle is pressed.
Multiple toggles
With the above, you might wonder, what happens if we add multiple toggles and or buttons to modify our state? Does it still work? Of course it does! Here's a convoluted example:
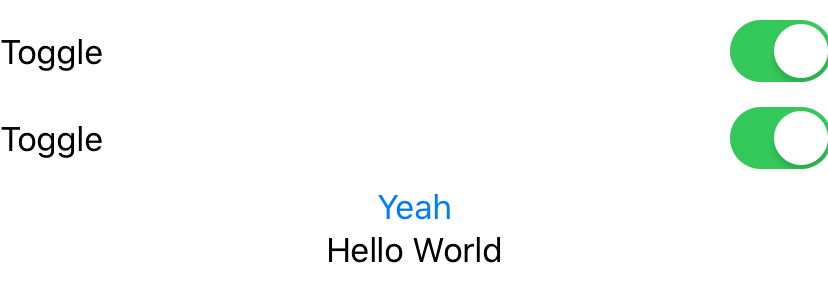
struct ButtonView : View {

     @State var visible: Bool = false

     var body : some View {

         VStack {

             Toggle(isOn: $visible) {

                 Text(\"Toggle\")

             }

             Toggle(isOn: $visible) {

                 Text(\"Toggle\")

             }

             Button(action: {

                 self.visible.toggle()

             }) {

                 Text(\"Yeah\")

             }

             if visible {

                 Text(\"Hello World\")

             }

         }

     }

}
Here, we have not one, not two, but there toggles that all refer to our visible. Tapping any one of them will change our state and will also update all our other toggles. This shows how powerful it is to have a declarative UI system that uses bindings to make sure there is only one source of truth.
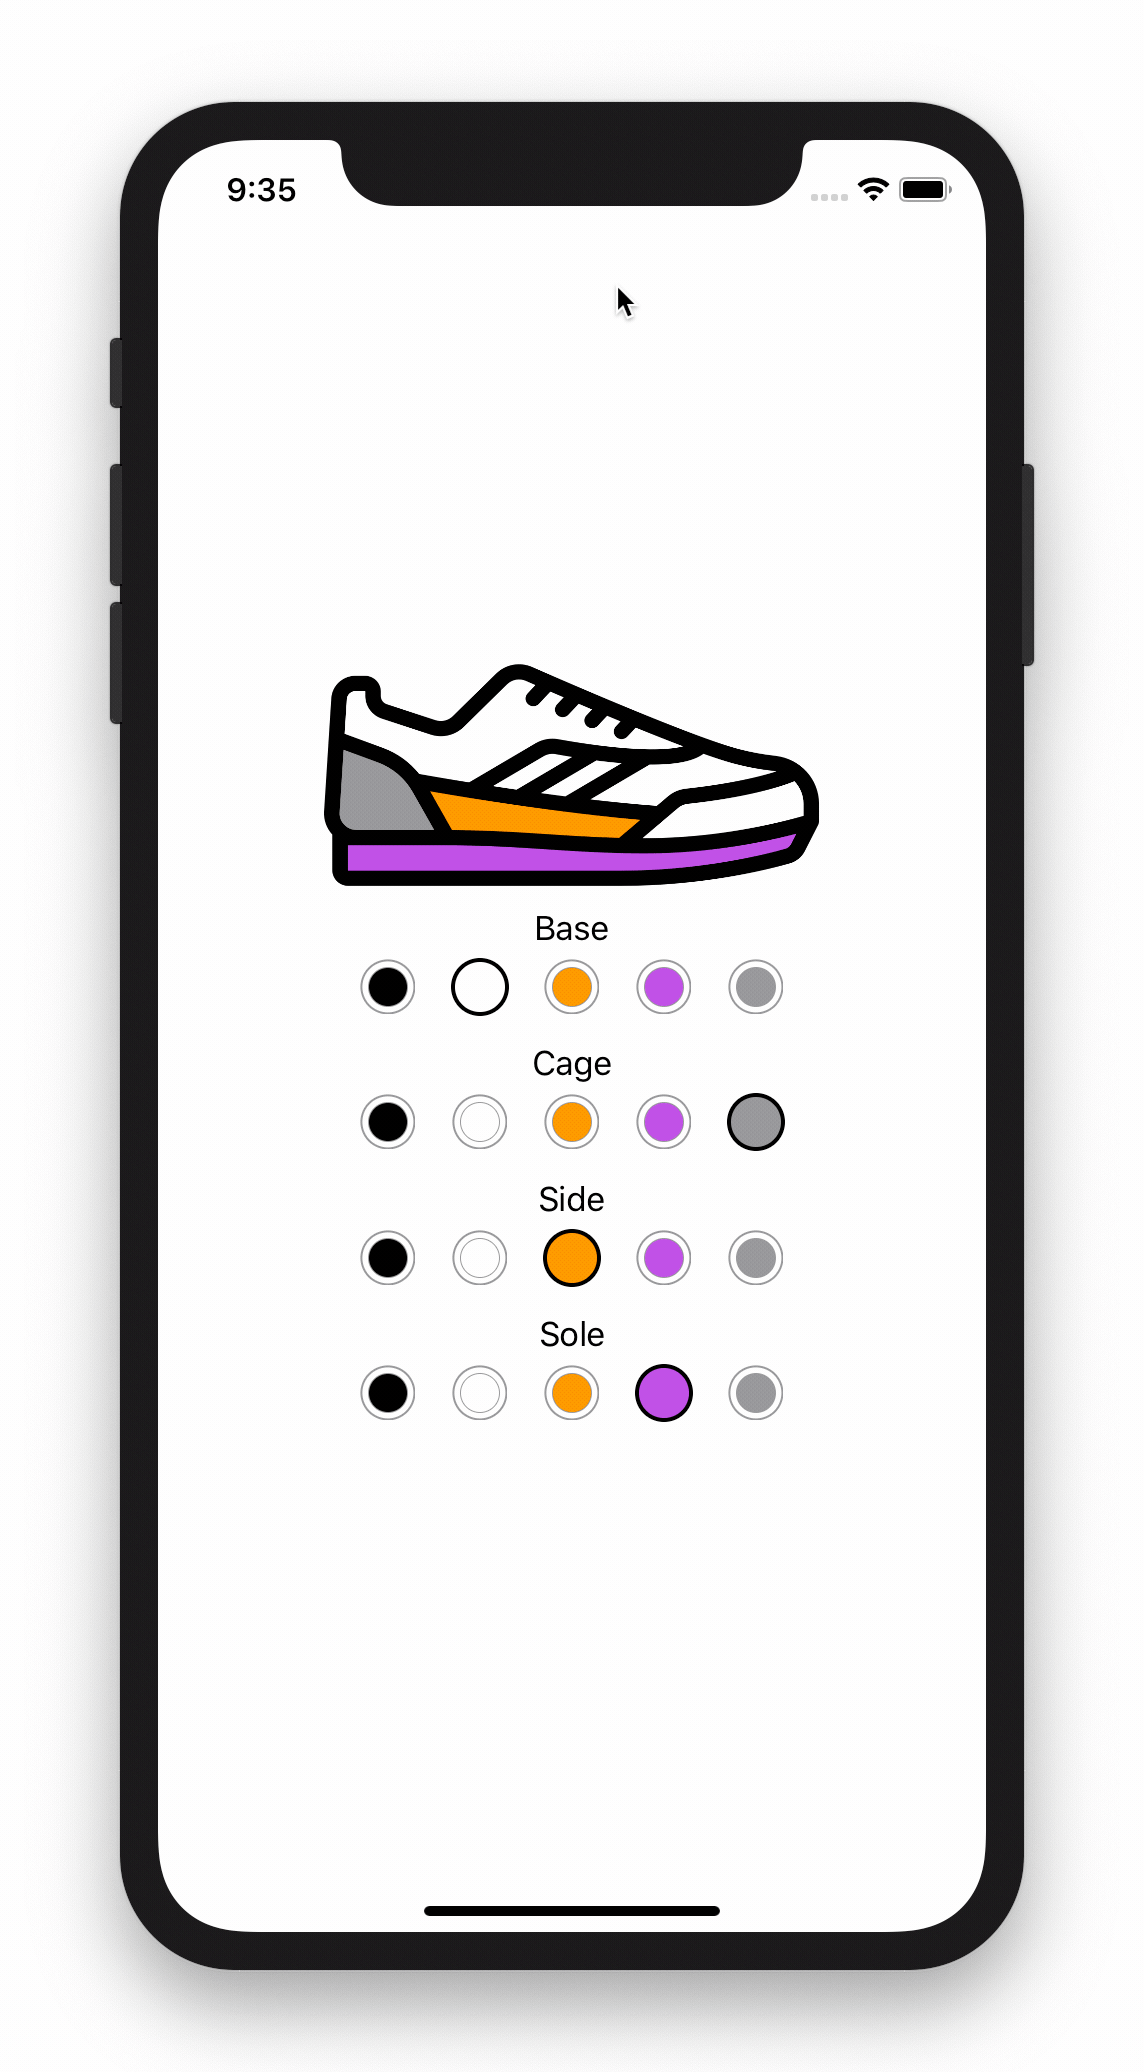
This was a brief overview of how SwiftUI works, and in the next section (coming soon!) we will build a UI to customize sneakers. Here's a preview already:
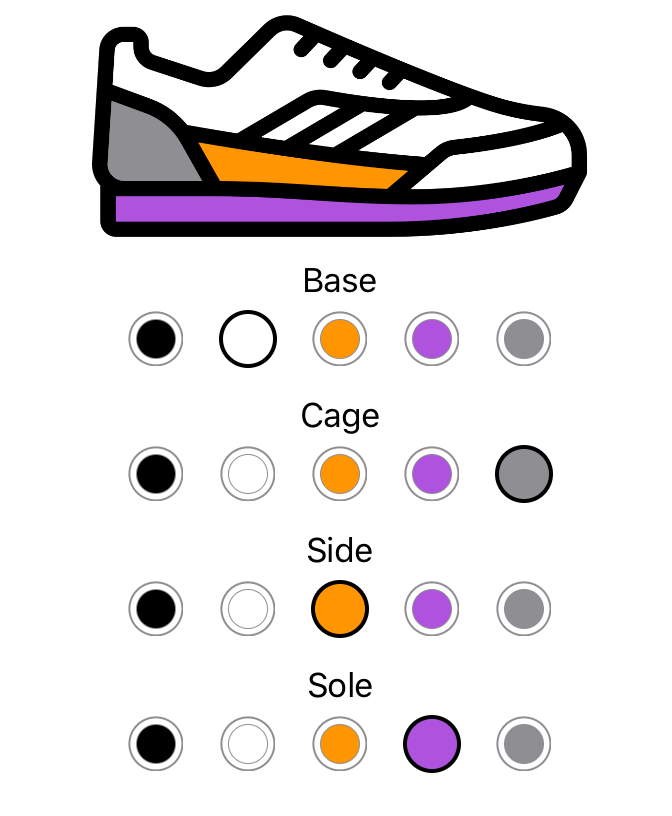
In order to better understand how SwiftUI works, we will develop a simple tutorial app. We will continue adding features to this app in the next chapters. For now, the first thing we will build is a simple way for users to customize / design sneakers. In order to allow this, we need a preview of the current sneaker, a way to change the colors of the current sneaker, and a way to store the current sneaker.
Here is a small GIF of what we are about to create.
The Model
Lets start with the model as it will help us shape the rest of the application. Currently, our model will only store the colors of the current sneaker. However, future chapters will also add the manufacturers name, shoe name, shoe model, etc. So in order to prepare for that we will have a more general ShoeConfiguration type that will contain a more distinct ShoeColors type. We will first have a look at this ShoeColors type.
struct ShoeColors {

     /// Outline Color

     var outline: Color

     /// Base Color

     var base: Color

     /// Side Color

     var side: Color

     /// Sole Color

     var sole: Color

     /// Back Cage Color

     var cage: Color

}
Our configuration has colors for multiple parts of the shoe. The outline, the base color, the side color, and so on. Note that we're not using UIColor or NSColor or CGColor, or even CIColor; no, there's a new color type in SwiftUI. It has a limited set of default color defintions, but it is sufficient for our use case here.
The next part is to have a configuration for our shoe. The colors will be just one part of the configuration. A first draft would look something like this:
class ShoeConfiguration {


     var shoeColors: ShoeColors


     init() {

         shoeColors = ShoeColors(outline: .black, base: .white, side: .orange, sole: .purple, cage: .gray)

     }

}
We're creating a simple class that acts as the configuration of one shoe. Currently, we're only hosting shoeColors, so there's not really much going on. What we do do, though, is to configure a default shoe in the initializer.
import SwiftUI

import Combine


class ShoeConfiguration: BindableObject {


     struct ShoeColors {

         var outline: Color

         var base: Color

         var side: Color

         var sole: Color

         var cage: Color

     }


     var shoeColors: ShoeColors {

         didSet {

             didChange.send(self)

         }

     }


     var didChange = PassthroughSubject<ShoeConfiguration, Never>()


     init() {

         shoeColors = ShoeColors(outline: .black, base: .white, side: .orange, sole: .purple, cage: .gray)

     }

}


struct ShoeView : View {


     @Binding var colors: ShoeConfiguration.ShoeColors


     private func colorParts() -> [(name: String, color: Color)] {

         return [

             (\"base\", colors.base),

             (\"side\", colors.side),

             (\"sole\", colors.sole),

             (\"cage\", colors.cage),

             (\"outline\", colors.outline)

         ]

     }


     var body: some View {

         ZStack {

             ForEach(colorParts().identified(by: \.name)) { shoePart in

                 Image(shoePart.name).resizable()

                     .renderingMode(.template)

                     .foregroundColor(shoePart.color)

             }

         }

     }

}


extension View {

     func scaledFrame(from geometry: GeometryProxy, scale: CGFloat) -> some View {

         self.frame(width: geometry.size.width * scale, height: geometry.size.height * scale)

     }

}


struct ColorPickerEntry : View {

     var selected: Bool

     var shoeColor: Color


     private let outerScale: CGFloat = 0.7

     private let innerScale: CGFloat = 0.5


     var body : some View {

         GeometryReader { geometry in

             Group {

                 if self.selected {

                     Circle().fill(self.shoeColor)

                         .overlay(Circle().stroke(Color.black, lineWidth: 2.0))

                         .scaledFrame(from: geometry, scale: self.outerScale)

                 } else {

                     Circle().stroke(Color.gray)

                         .scaledFrame(from: geometry, scale: self.innerScale)

                         .overlay(Circle().fill(self.shoeColor)

                             .scaledFrame(from: geometry, scale: self.innerScale), alignment: .center)

                         .overlay(Circle().stroke(Color.gray)

                             .scaledFrame(from: geometry, scale: self.outerScale))

                 }

             }.frame(width: geometry.size.width, height: geometry.size.height)

         }

     }

}


struct ColorPicker : View {

     @Binding var selectedColor: Color

     var name: String

     var body : some View {

         VStack(alignment: HorizontalAlignment.center, spacing: 0) {

             Text(name).font(.body)

             HStack {

                 ForEach([Color.black, Color.white, Color.orange, Color.purple, Color.gray].identified(by: \.hashValue)) { color in

                     Button(action: {

                         self.selectedColor = color

                     }) {

                         ColorPickerEntry(selected: self.selectedColor.hashValue == color.hashValue, shoeColor: color)

                             .frame(width: 38, height: 38)

                     }

                 }

             }

         }

     }

}


struct ShoeConfigurator : View {


     @ObjectBinding var shoeConfiguration = ShoeConfiguration()


     var body: some View {

         VStack {

             ShoeView(colors: $shoeConfiguration.shoeColors)

                 .frame(width: 250, height: 114, alignment: .center)

             ColorPicker(selectedColor: $shoeConfiguration.shoeColors.base,

                         name: \"Base\")

             ColorPicker(selectedColor: $shoeConfiguration.shoeColors.cage,

                         name: \"Cage\")

             ColorPicker(selectedColor: $shoeConfiguration.shoeColors.side,

                         name: \"Side\")

             ColorPicker(selectedColor: $shoeConfiguration.shoeColors.sole,

                         name: \"Sole\")

         }

     }

}


struct ContentView : View {

     @State private var selection = 0


     var body: some View {

         ShoeConfigurator()

     }

}


#if DEBUG

struct ContentView_Previews : PreviewProvider {

     static var previews: some View {

         ContentView()

     }

}

#endif
| Similar Articles |
|---|